The dashboard includes a live preview of your chatbot. You can use this interface to test its responses and behavior in real-time, based on its current training data, without needing to install it on your live website first.
Website
The Website data source section is the central hub for managing all content scraped from web pages. You can add content in several ways and then manage it through its lifecycle: from unscraped, to trained, to archived.
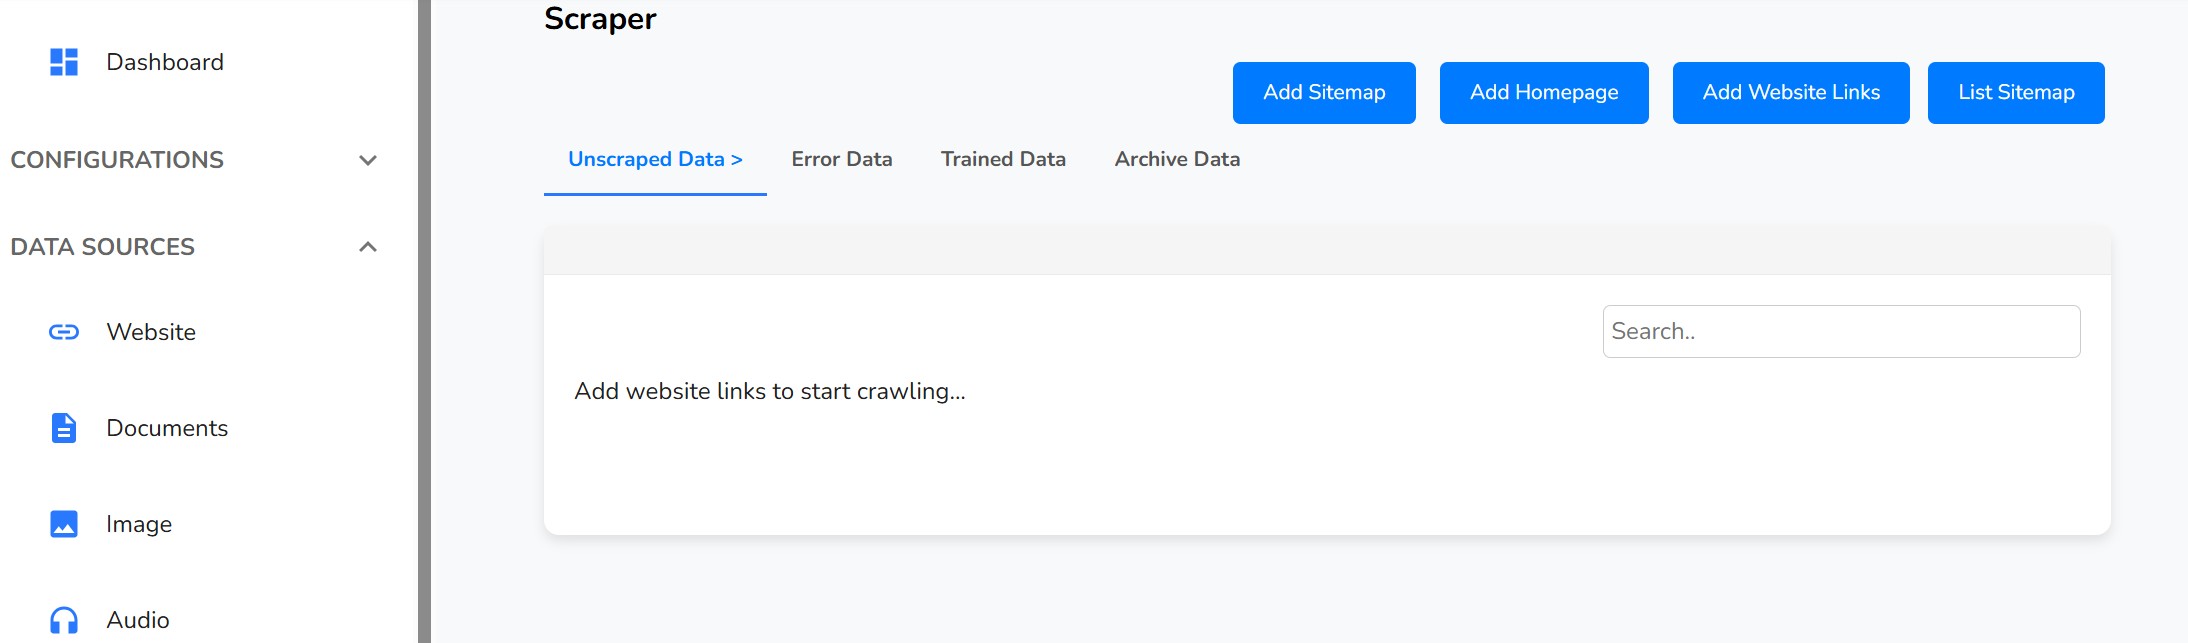
Add Sitemap
A sitemap is the most efficient way to add all your website's pages at once. It's a file that lists every page on your site, ensuring the chatbot can discover and learn from all available content.
How to Add a Sitemap:
- From the main Scraper page, click the "Add Sitemap" button.
- A modal window will appear.
- Enter the full URL of your sitemap (e.g.,
https://yourcompany.com/sitemap.xml).
- Click the "Add Sitemaps" button.
The system will then add all the URLs found in the sitemap to the "Unscraped Data" queue for processing.
Add Homepage
If you don't have a sitemap, you can add your website's homepage. The system will crawl this page and automatically discover and add other pages that are linked from it.
How to Add a Homepage:
- From the main Scraper page, click the "Add Homepage" button.
- In the modal window, enter your full homepage URL (e.g.,
https://yourcompany.com).
- Click the "Add Homepage" button.
The URLs found by the crawler will be added to the "Unscraped Data" queue.
Add Website Links
This option allows you to add individual web page URLs one by one. This is useful for adding specific pages that may not be in your sitemap or for quickly adding new content.
How to Add a Single Link:
- From the main Scraper page, click the "Add Website Links" button.
- In the modal window, enter a single, full URL of a web page.
- Click the "Add Website Link" button. The URL will be added to the "Unscraped Data" queue.
List Sitemap
You can view and manage the sitemaps you have previously added.
How to View Added Sitemaps:
- From the main Scraper page, click the "List Sitemap" button.
- A side panel will open, showing a list of all sitemap URLs you have submitted.
- You can permanently delete a sitemap from this list by clicking the trash icon next to it.
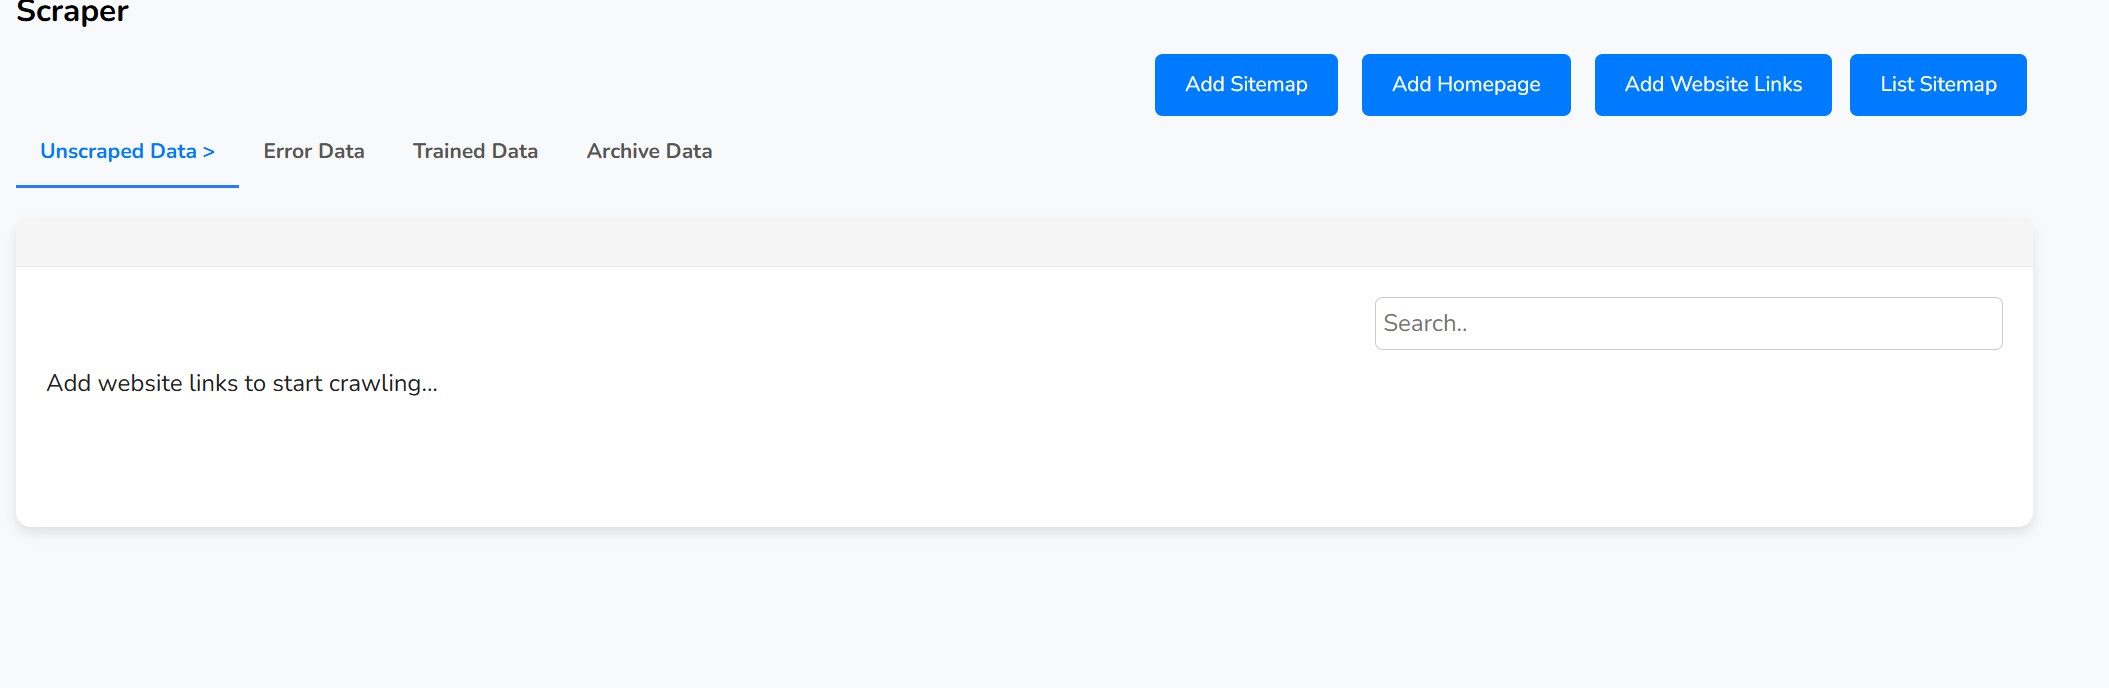
Unscraped Data
This is the first tab in the Scraper section. It acts as a queue, listing all the website links that have been added but have not yet been processed (scraped) for content. From here, you initiate the training process.
How to Use This Table:
- Use the checkboxes on the left to select the URLs you want to process. You can select up to 99 links at a time.
- Once you have made your selection, a set of buttons will appear.
- Click the "Scrape Data and Train" button to begin processing the selected links.
- A status modal will appear, showing the real-time progress of each URL being scraped.
Successfully scraped links will be moved to the "Trained Data" tab, while any links that fail will be moved to the "Error Data" tab.
You can also delete links from this queue individually with the icon or in bulk with the "Bulk Delete" button.
Error Data
This tab contains a list of all website links that failed during the scraping process. This could be due to the page being unavailable, blocked, or in an unreadable format.
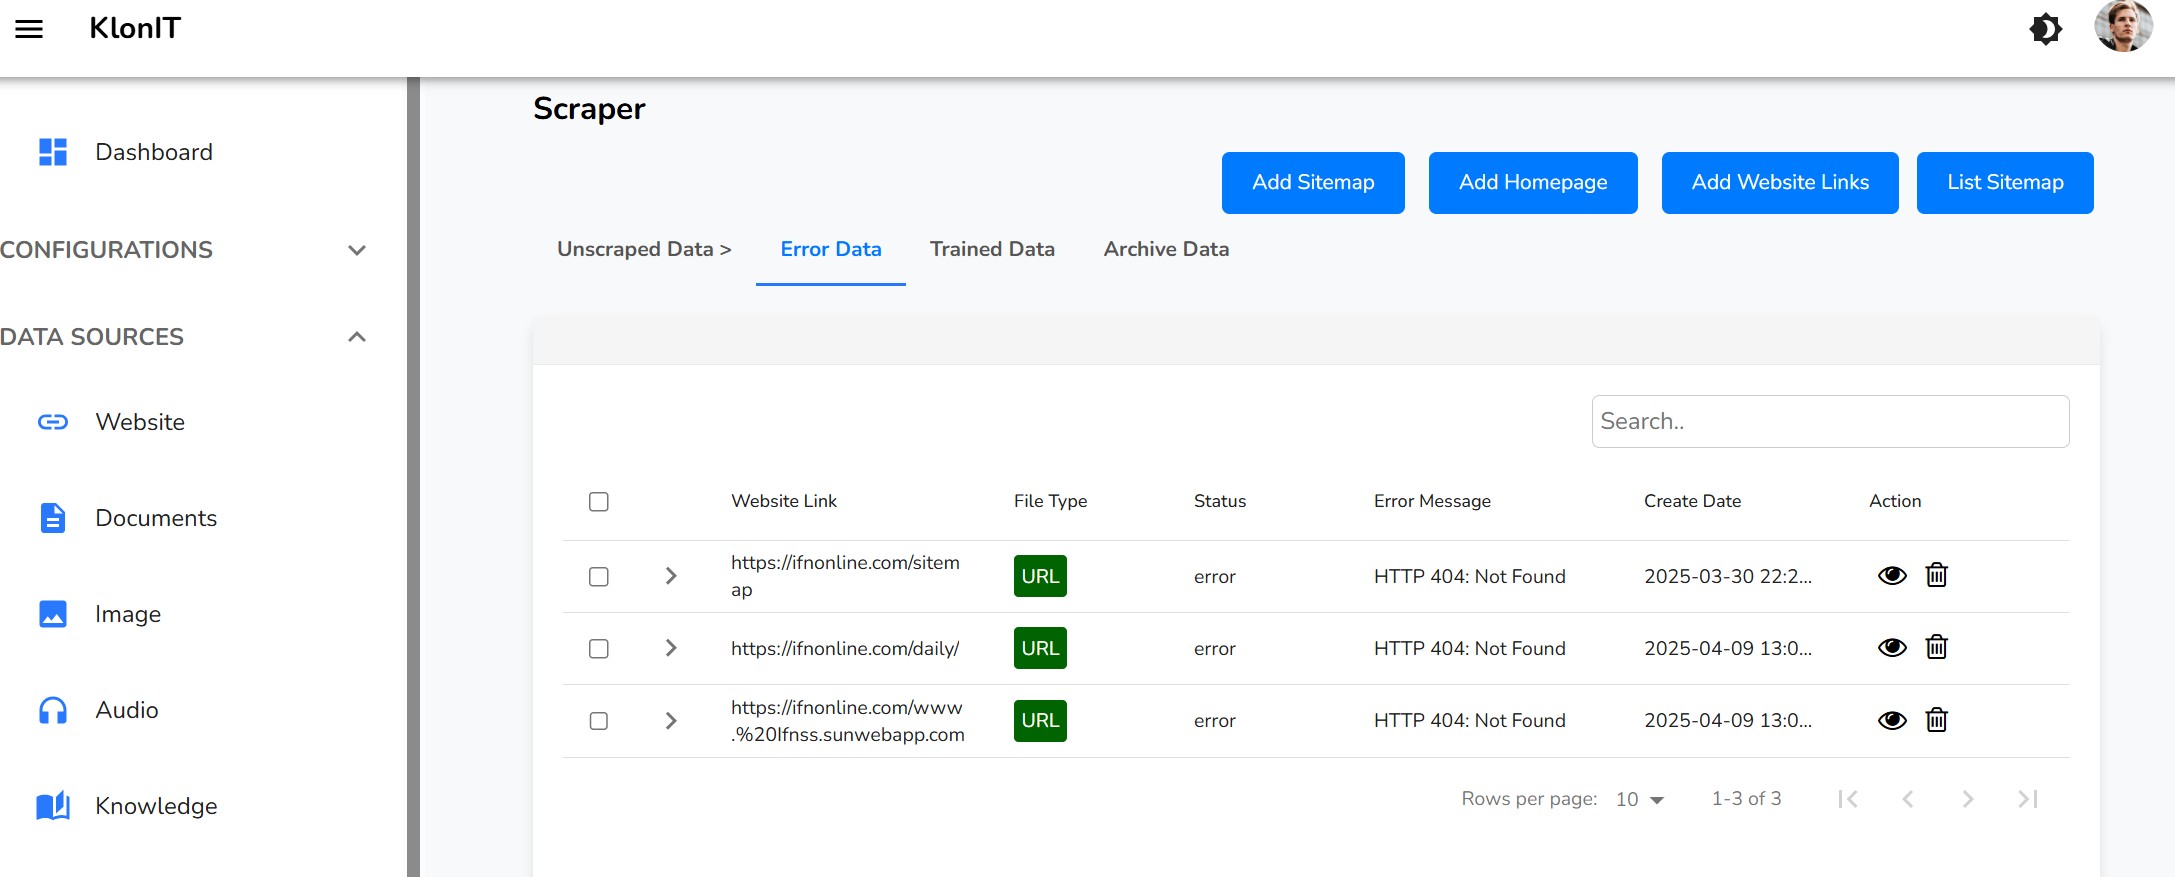
Managing Errors:
- Review the Error: The table includes a column with the specific error message to help you diagnose the issue.
- Retry Scraping: You can select one or more failed items and click the "Scrape Data and Train" button to try processing them again.
- Delete: You can remove links from this list permanently using the individual or bulk delete actions.
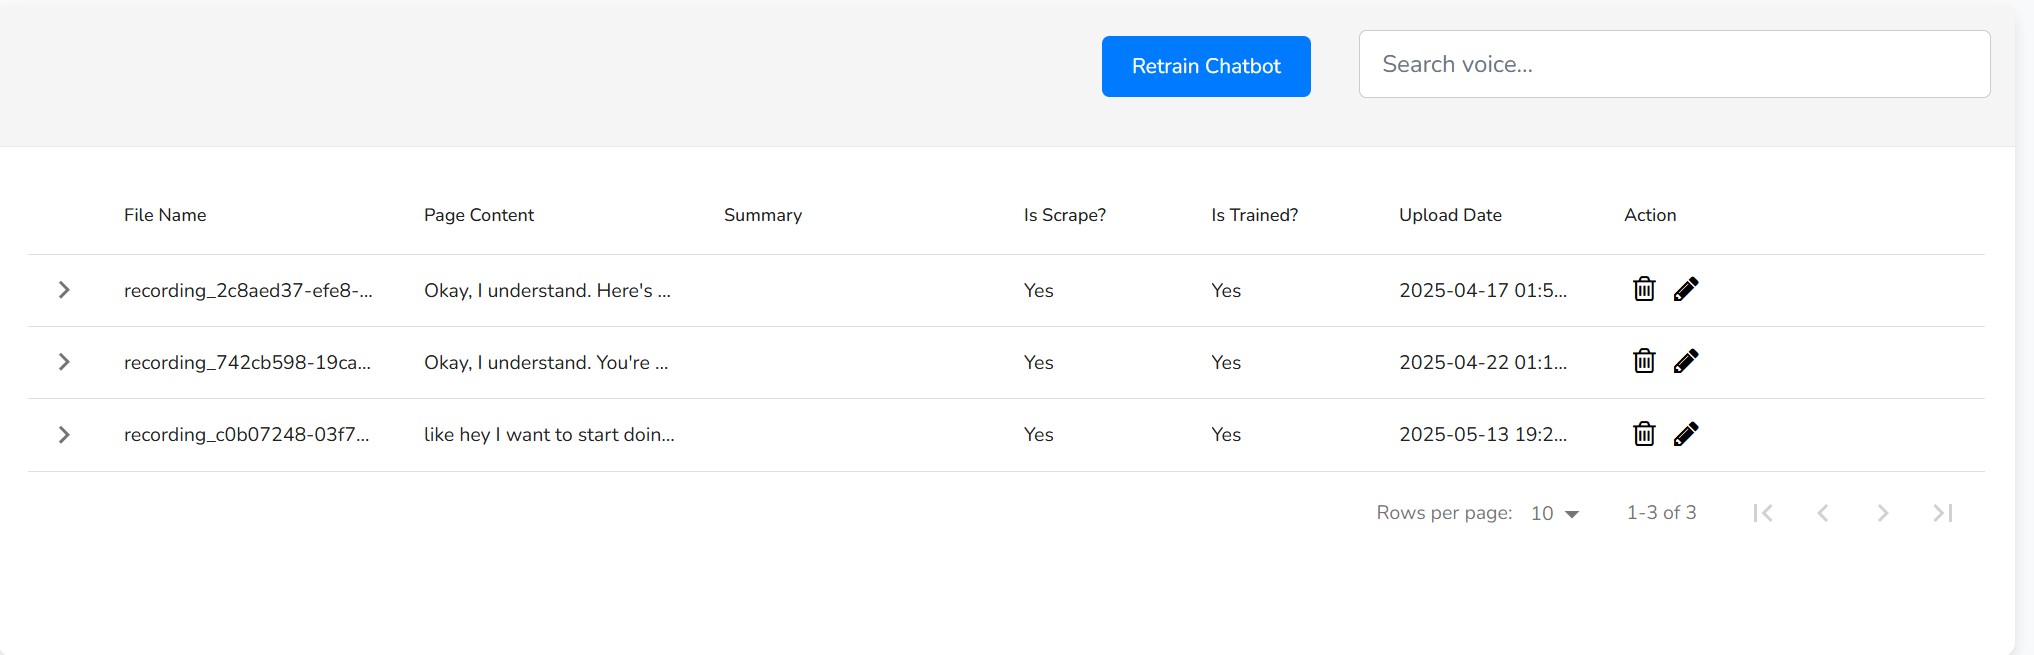
Trained Data
This is the core knowledge base of your chatbot. It contains all the website data that has been successfully scraped, processed, and is actively being used to answer questions.
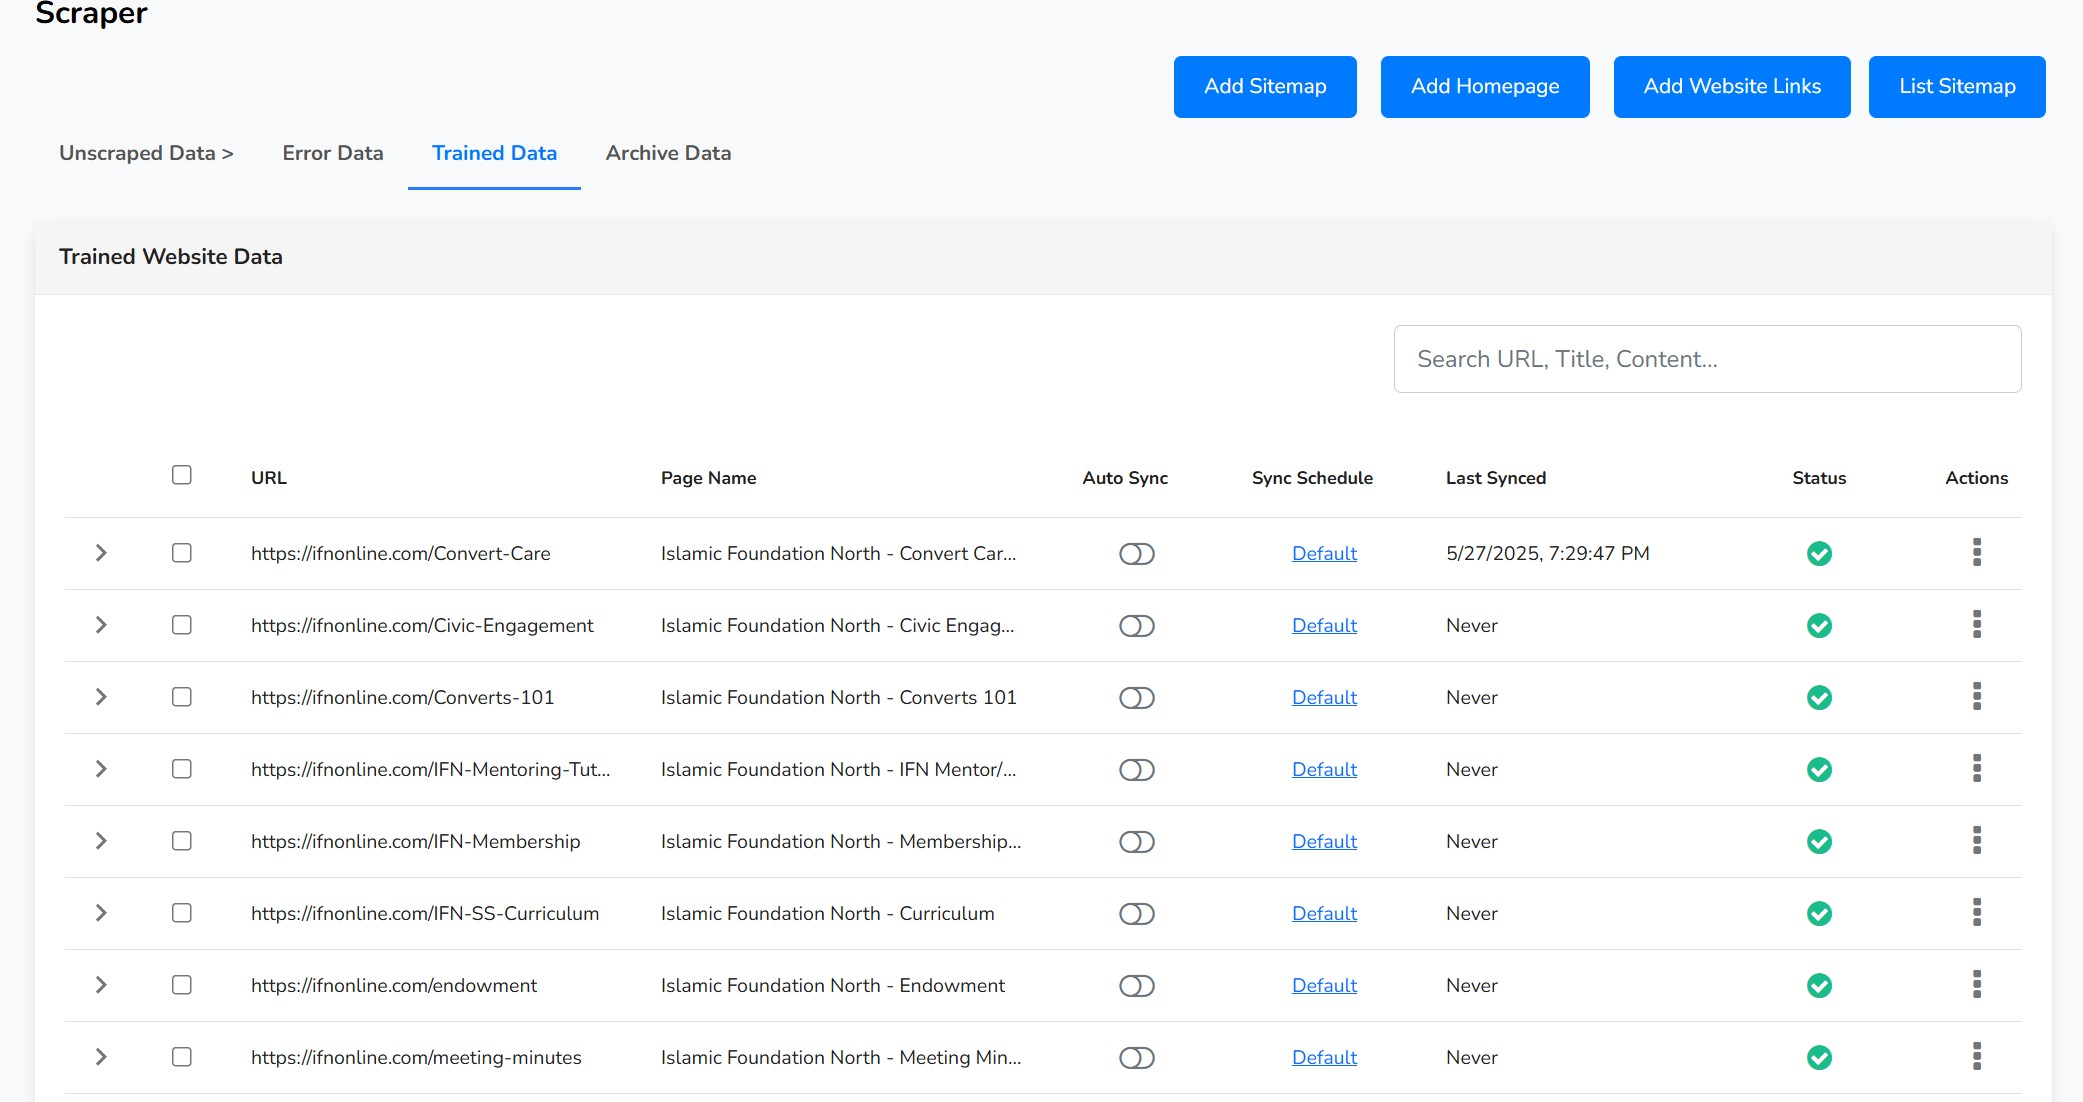
Understanding the Table:
- URL/Page Name: Identifies the source of the data.
- Auto Sync & Sync Schedule: Controls if and how often the system automatically checks the live webpage for content changes. Click on these fields to configure them.
- Status: Shows if a page has a "Pending" update that needs your review.
Managing Trained Data:
You can perform actions on individual items using the "more" icon () at the end of each row, or on multiple items by selecting them with the checkboxes.
Key Actions:
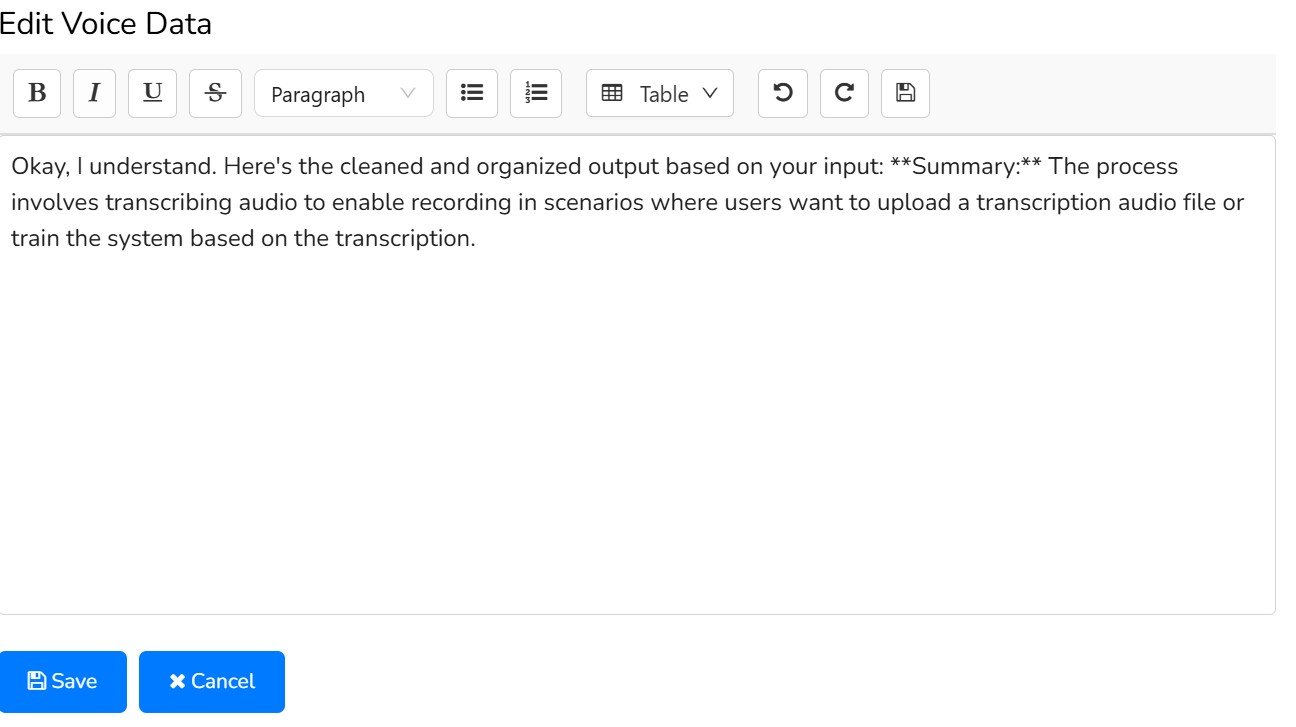
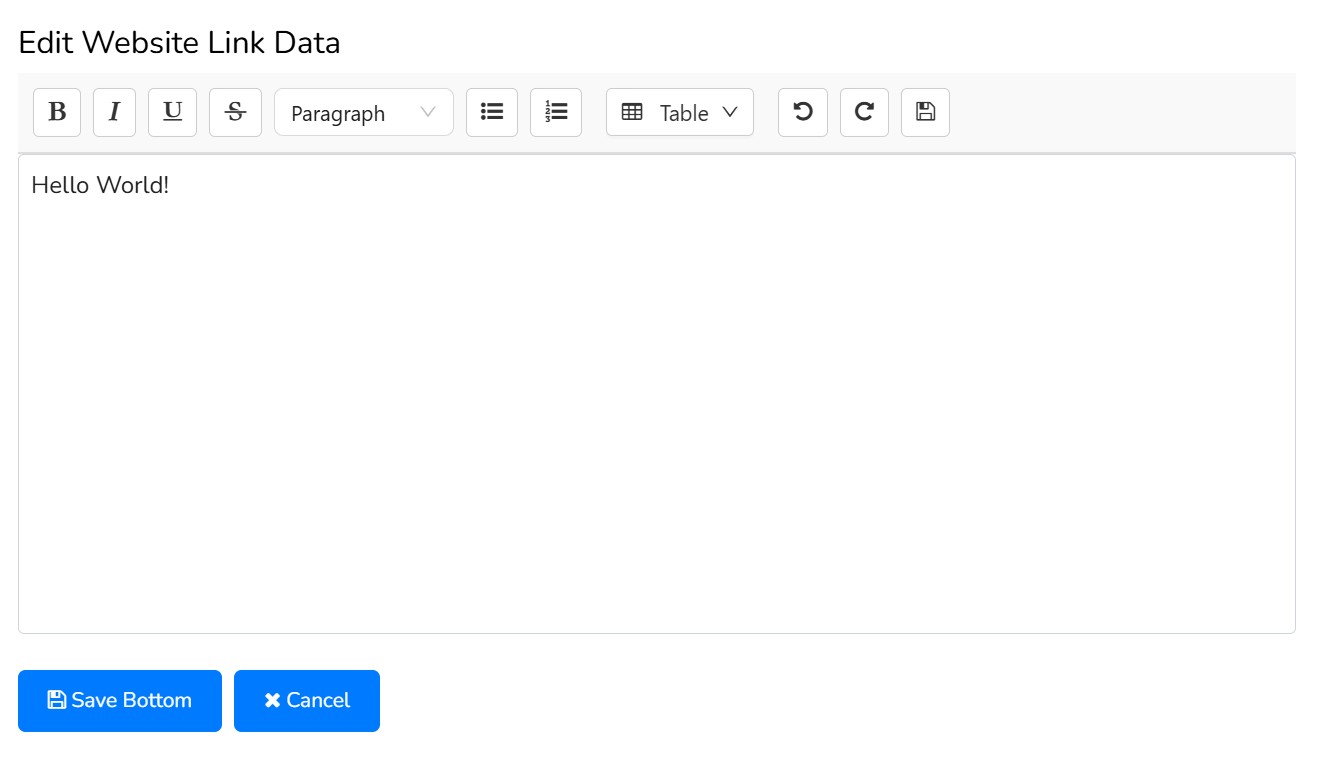
- Edit Content: Opens a rich-text editor allowing you to manually modify the raw text content that was scraped from the page. This is useful for removing unwanted sections (like ads or menus).
- Edit Summary: Opens an editor to modify the AI-generated summary of the content. This summary is often used by the AI for quicker responses.
- Refresh & Retrain: Re-scrapes the live webpage to fetch the latest content and retrains the chatbot on it.
- Archive: Removes the data from the active knowledge base and moves it to the "Archive Data" tab. The chatbot will no longer use this information.
- Delete: Permanently deletes the data from the system.
Pending Updates:
If Auto-Sync is enabled, the system may find changes on a webpage. When this happens, the status will change to "Pending". Click this status to open a comparison view where you can review the differences and either Approve the new content or Reject the changes.
Archive Data
This tab holds data that you have removed from the active training set but have not permanently deleted. The chatbot does not use information from the archive.
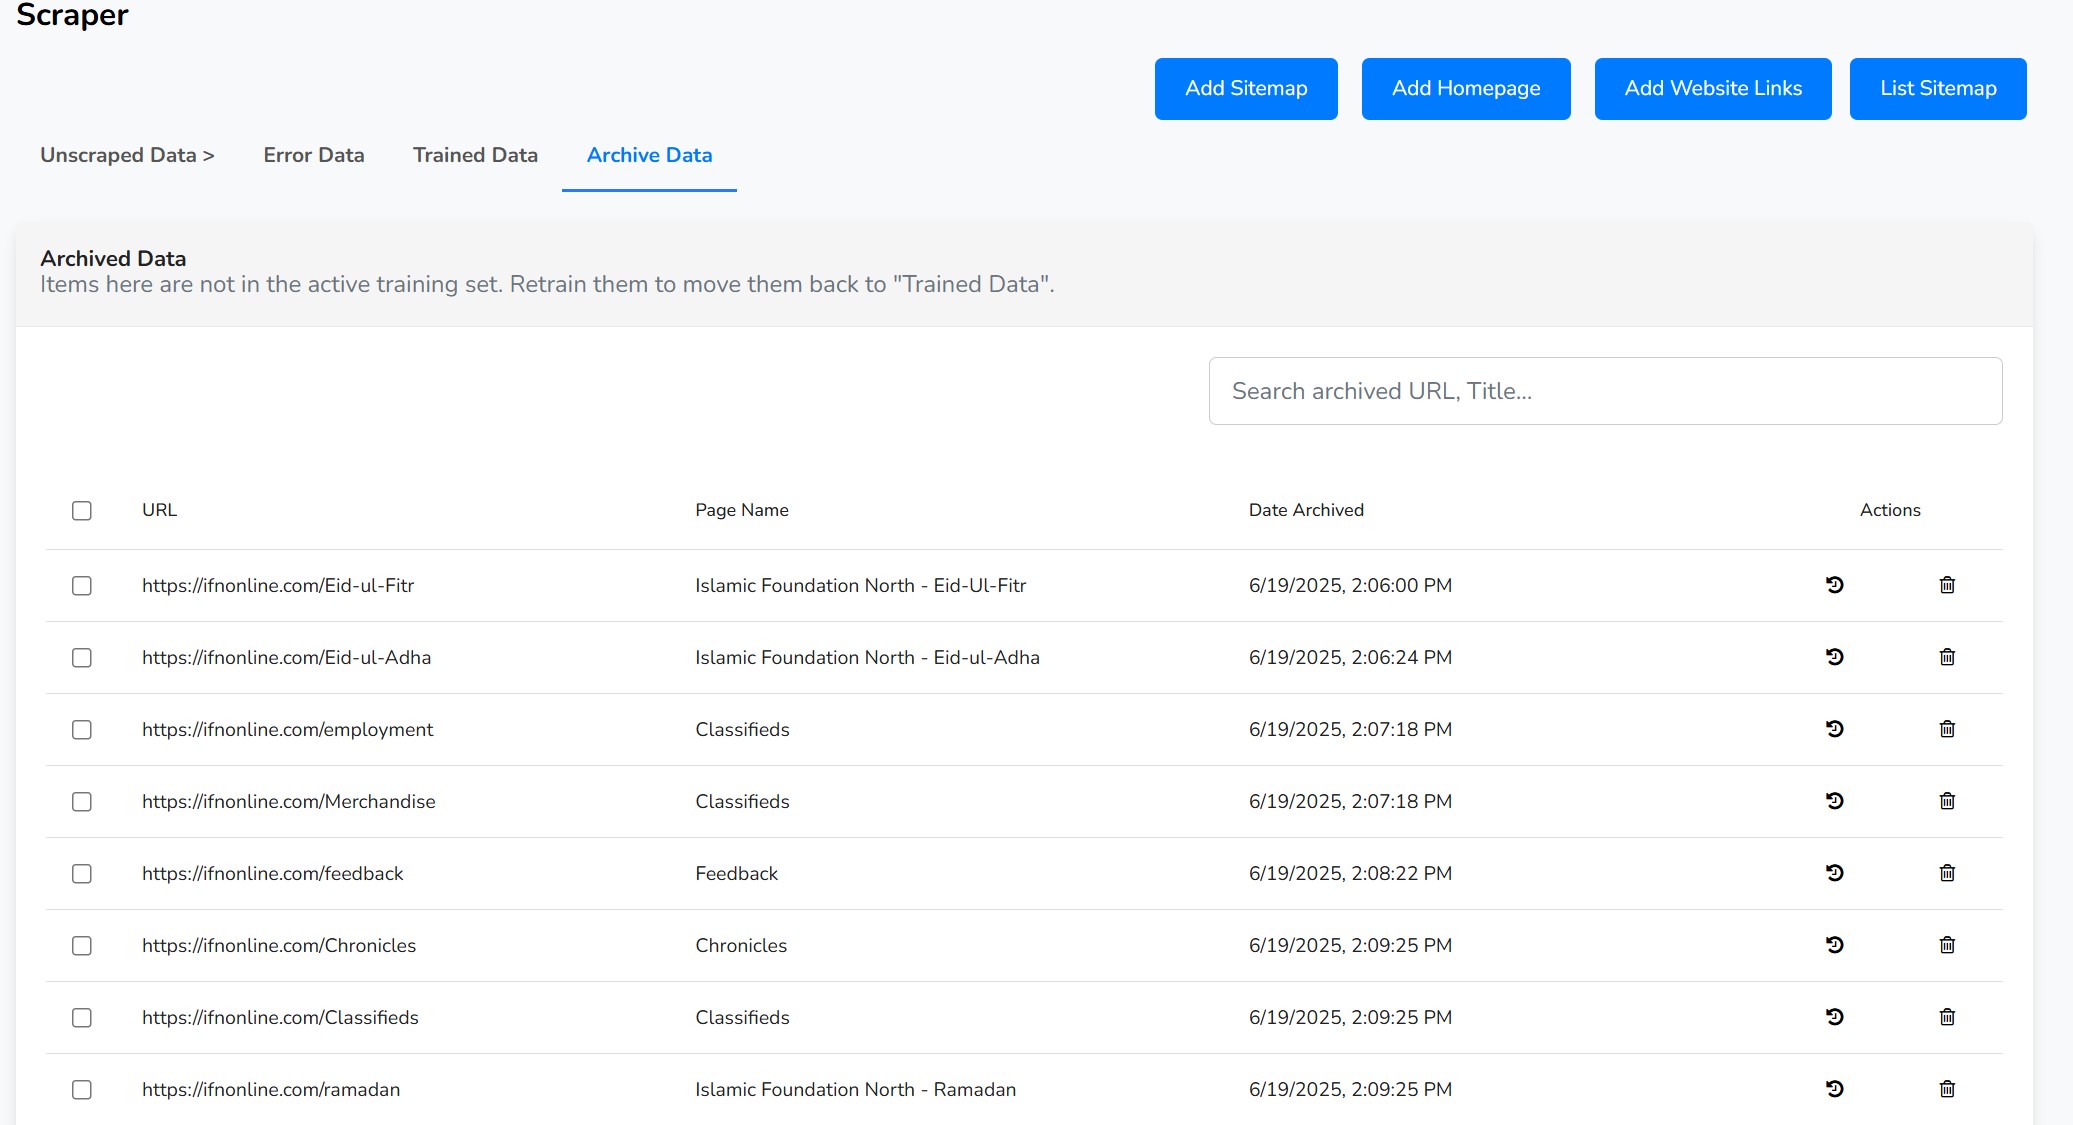
Managing Archived Data:
From here, you have two main options for each item:
-
Retrain & Unarchive (): This action moves the data back to the "Trained Data" tab, making it active again in the chatbot's knowledge base.
-
Delete Permanently (): This action will permanently remove the data from the system. This cannot be undone.
These actions can be performed on individual items or in bulk by selecting multiple rows.
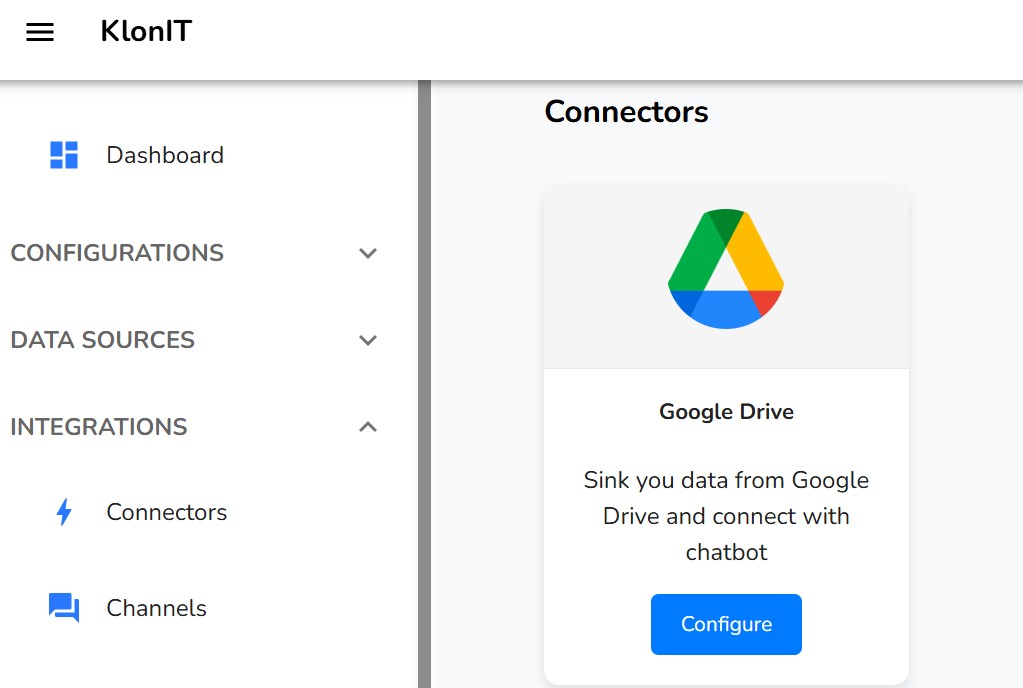
Connectors
Connectors allow you to link your chatbot to external services like Google Drive. By establishing a connection, you can easily sync and train your chatbot on documents, spreadsheets, and other files stored in the cloud, keeping its knowledge base up-to-date automatically.
Google Drive
The Google Drive connector lets you securely link your account to select files and folders for chatbot training. This is a powerful way to manage your knowledge base using the familiar interface of Google Drive.
Connect to Google Drive
To begin, you must first authorize the application to access your Google Drive files.
How to Connect:
- Navigate to the Google Drive Connector page.
- Click the "Connect to Google Drive" button.
- You will be redirected to a Google authentication page. If you are not already logged in, you will be prompted to sign in to your Google account.
- Google will ask you to grant permission for the application to access your files. Review the permissions and click "Allow" or "Continue".
- After granting permission, you will be redirected back to the application. The page will now show that you are connected and will display a table for managing your synced files.
List & Manage Files
Once connected, this page will display a table of all the files you have synced from your Google Drive. This is your central hub for managing your cloud-based knowledge source.
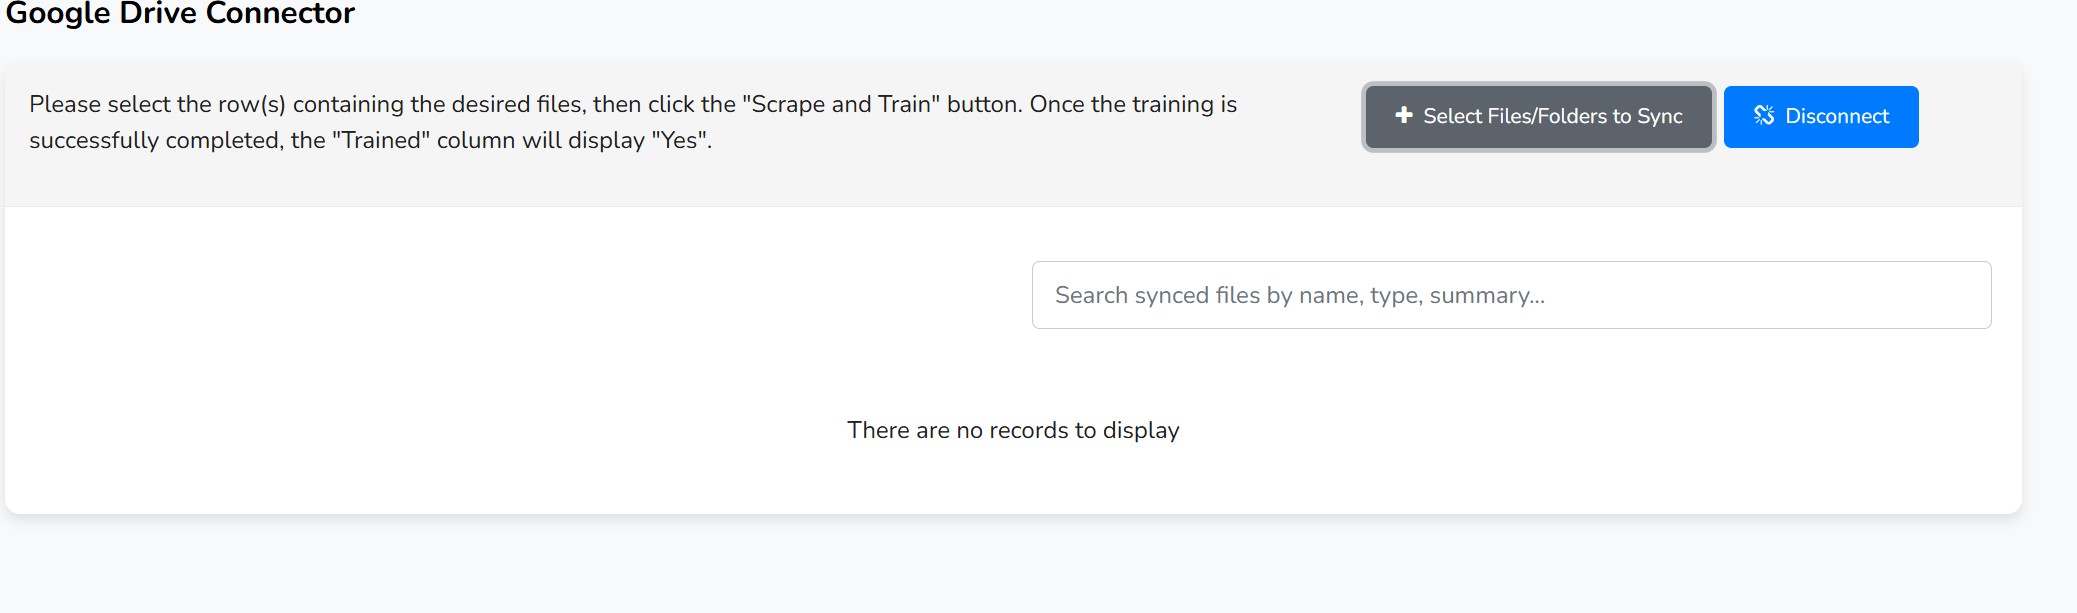
Managing Your Synced Files
The table provides several options for managing each file:
- Scrape & Train: After syncing new files, select them using the checkboxes and click the "Scrape & Train Selected" button. This action processes the file's content and trains the chatbot on it.
- Edit Content (): Opens a modal with a text editor, allowing you to modify the text extracted from the file. This is useful for correcting errors or removing irrelevant content.
- Refresh (): Re-fetches the latest version of the file from Google Drive and retrains the chatbot on the new content.
- View in Drive (): Opens the file directly in Google Drive in a new browser tab.
- Delete (): Removes the file from your synced list and its content from the chatbot's knowledge. This does not delete the file from your Google Drive.
Auto Sync and Pending Updates
You can configure files to sync automatically. Click on the status under the "Auto Sync" or "Schedule" columns to open the sync settings modal.
- Sync Settings: In the modal, you can enable automatic syncing and set a custom interval (in days) for how often the system should check for updates.
- Review Pending Updates: If auto-sync is on and the system detects a change in a file you've previously edited manually, the status will change to "Review". Clicking this opens a side-by-side comparison, allowing you to edit and accept the new version or reject it to keep your manually edited version.

Select Files to Sync
After connecting your account, the first step is to choose which files or folders the chatbot should learn from. This is done using the Google Drive Picker.
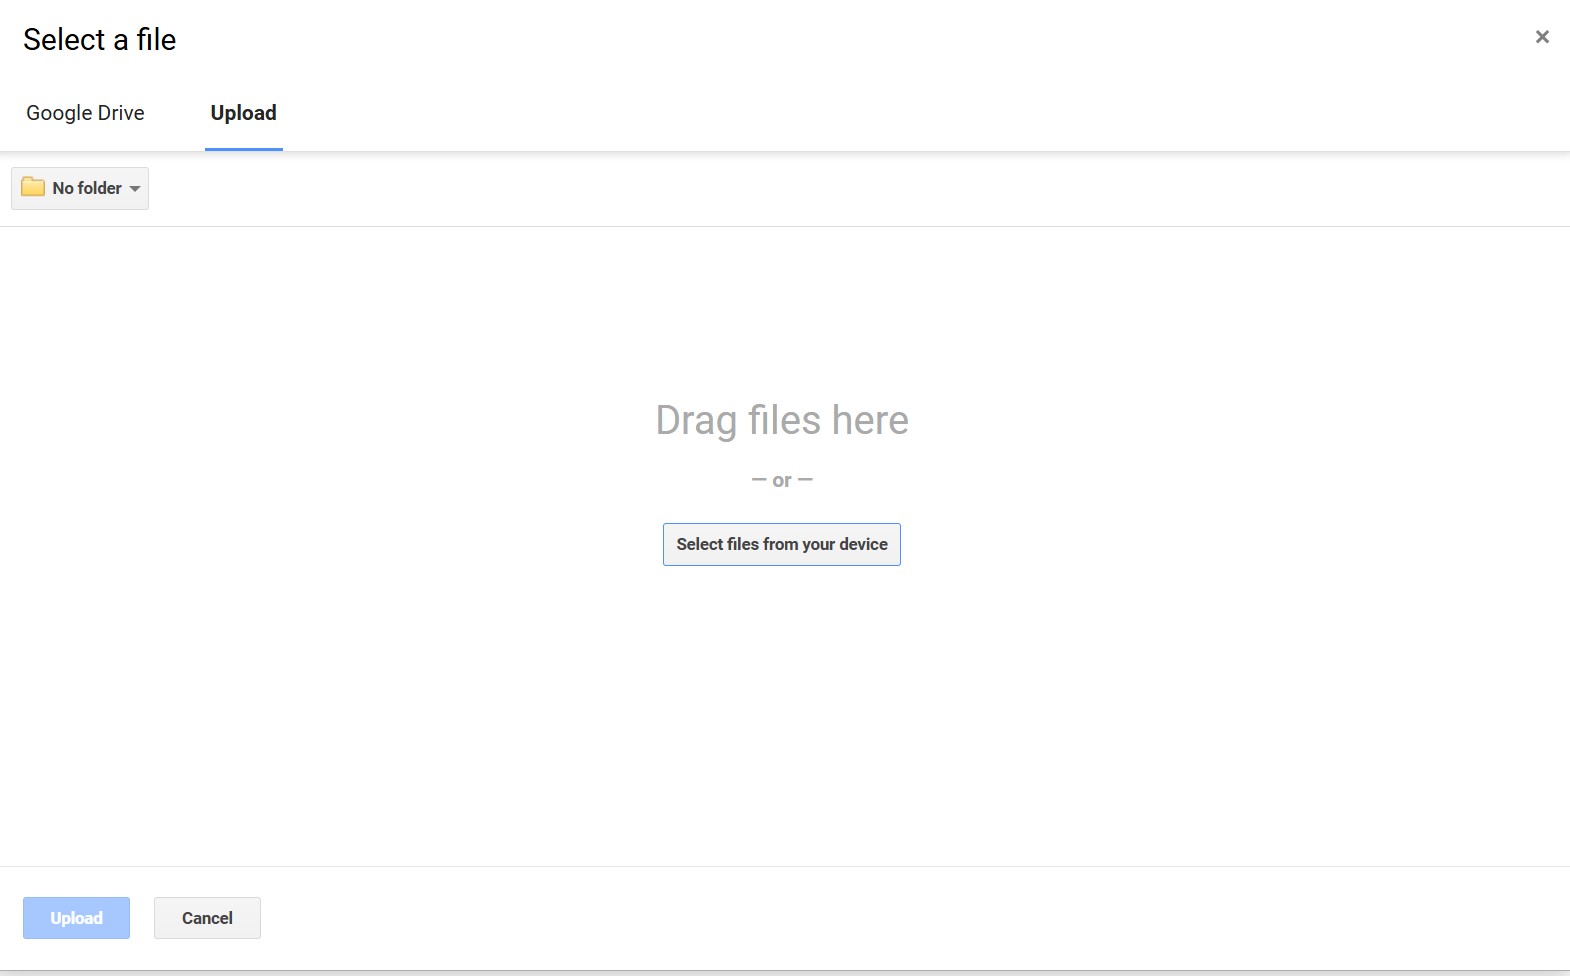
How to Sync Files and Folders:
- On the Google Drive Connector page, click the "Select Files/Folders to Sync" button.
- The Google Drive Picker window will open, showing the files and folders in your drive.
- Navigate through your drive and select one or more files or entire folders.
- Click the "Select" or "Open" button in the picker window.
- The selected files will be added to the sync list in the application. You will see them appear in the main table on the page.
Next Step: Scrape and Train
After syncing files, they are listed but not yet part of the chatbot's knowledge. You must select the new files from the table and click the "Scrape & Train Selected" button to complete the process.
Disconnect
If you no longer want the application to have access to your Google Drive, you can revoke its permissions at any time.
How to Disconnect:
- On the Google Drive Connector page, click the "Disconnect" button.
- Confirm the action if prompted.
This will securely remove the application's authorization token. All automatic syncing will stop, and you will need to reconnect to add or refresh any more files.
OneDrive
The OneDrive connector lets you securely link your Microsoft account to select files and folders for chatbot training. This is a powerful way to manage your knowledge base using the familiar interface of OneDrive.
Connect to OneDrive
To begin, you must first authorize the application to access your OneDrive files. This process is secure and handled directly by Microsoft.

How to Connect:
- Navigate to the OneDrive Connector page.
- Click the "Connect to OneDrive" button.
- You will be redirected to a Microsoft authentication page. If you are not already logged in, you will be prompted to sign in to your Microsoft account.
- Microsoft will ask you to grant permission for the application to access your files. Review the permissions and click "Accept" or "Continue".
- After granting permission, you will be redirected back to the application. The page will now show that you are connected and will display a table for managing your synced files.
Note: Only users with an "Admin" role can initiate the connection to OneDrive. Other users will see a message to contact their administrator.
List & Manage Files
Once connected, this page will display a table of all the files you have synced from your OneDrive. This is your central hub for managing your cloud-based knowledge source.

Managing Your Synced Files
The table provides several options for managing each file:
- Scrape & Train: After syncing new files, select them using the checkboxes and click the "Scrape & Train Selected" button. This action processes the file's content and trains the chatbot on it.
- Edit Content (): Opens a modal with a text editor, allowing you to modify the text extracted from the file. This is useful for correcting errors or removing irrelevant content. This does not change the original file in your OneDrive.
- Refresh (): Re-fetches the latest version of the file from OneDrive and retrains the chatbot on the new content.
- View in OneDrive (): Opens the file directly in OneDrive in a new browser tab.
- Delete (): Removes the file from your synced list and its content from the chatbot's knowledge. This does not delete the file from your OneDrive.
Auto Sync and Pending Updates
You can configure files to sync automatically. Click on the status under the "Auto Sync" or "Schedule" columns to open the sync settings modal.
- Sync Settings: In the modal, you can enable automatic syncing and set a custom interval (in days) for how often the system should check for updates.
- Review Pending Updates: If auto-sync is on and the system detects a change in a file you've previously edited manually, the status will change to "Review". Clicking this opens a side-by-side comparison, allowing you to edit and accept the new version or reject it to keep your manually edited version.

Select Files to Sync
After connecting your account, the first step is to choose which files the chatbot should learn from. This is done using a dedicated OneDrive file browser.

How to Sync Files:
- On the OneDrive Connector page, click the "Select Files from OneDrive" button.
- A new popup window will open, showing the files and folders in your OneDrive.
- Navigate through your folders, select one or more files using the checkboxes, and then click the "Add files" button.
- The selected files will be added to the sync list in the application. You will see them appear in the main table on the page.
Next Step: Scrape and Train
After syncing files, they are listed but not yet part of the chatbot's knowledge. You must select the new files from the table and click the "Scrape & Train Selected" button to complete the process.
Disconnect
If you no longer want the application to have access to your OneDrive, you can revoke its permissions at any time. This option is available to users with an "Admin" role.
How to Disconnect:
- On the OneDrive Connector page, click the "Disconnect" button.
- Confirm the action if prompted.
This will securely remove the application's authorization. All automatic syncing will stop, and you will need to reconnect to add or refresh any more files.
Agents
AI Agents are specialized tools that give your chatbot new abilities beyond just answering questions from your knowledge base. They can connect to external services like Google Calendar or a MySQL database to perform actions, such as booking meetings or fetching live data. This section explains how to configure and manage these powerful agents.
The main "Manage Your AI Agents" page provides an overview of all available agents, their current status, and links to configure them.
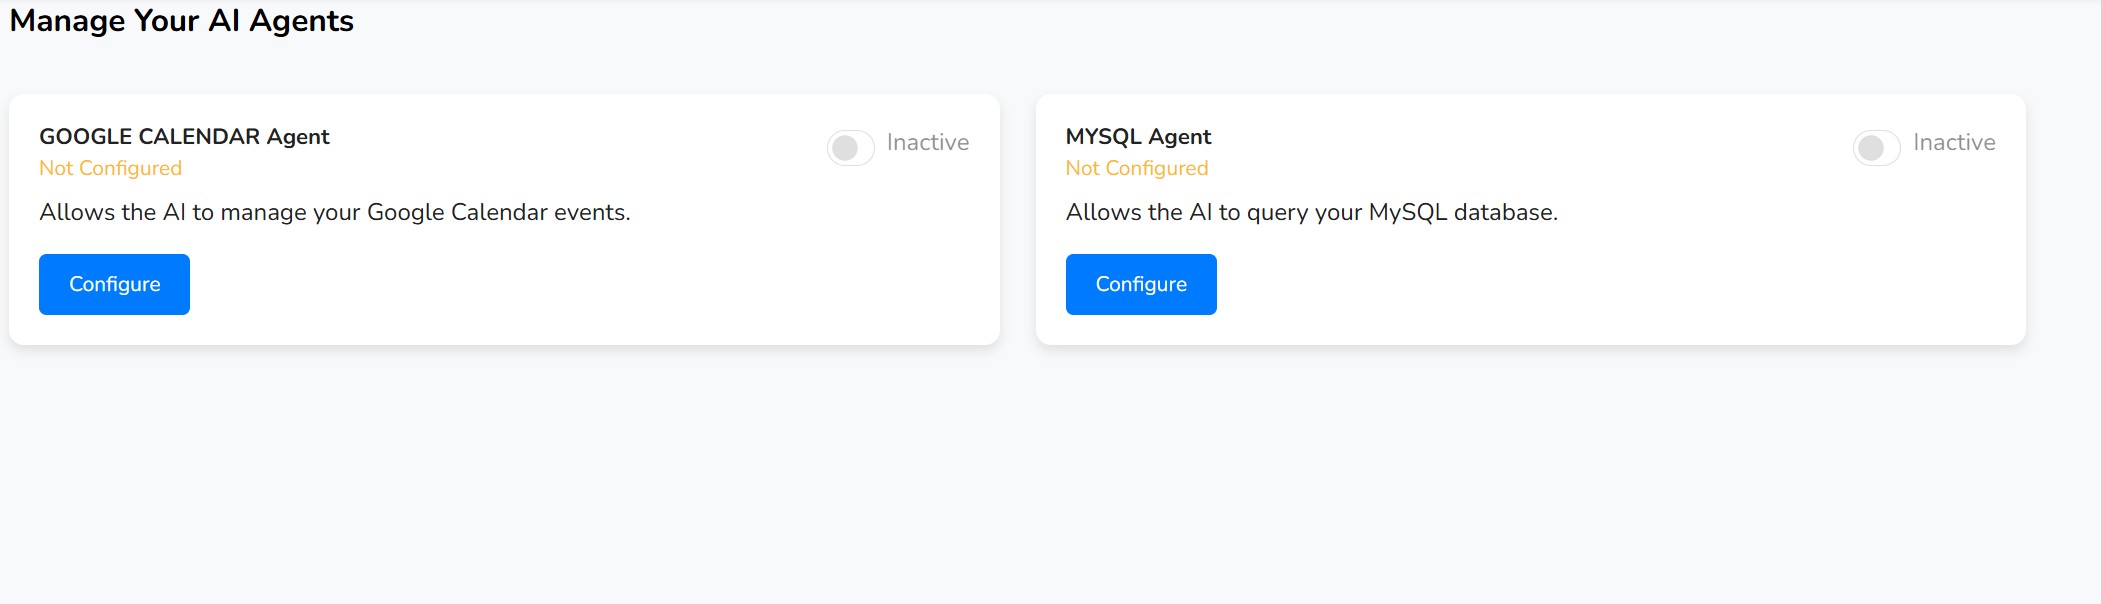
Understanding the Agent Card
- Configured / Not Configured: This status tells you if the necessary credentials and settings have been saved for the agent. You must configure an agent before you can activate it.
- Active / Inactive Toggle: This switch allows you to enable or disable an agent. An agent must be configured before it can be activated. When active, the chatbot can use its special abilities. When inactive, it will behave as a standard Q&A bot.
- Configure / Manage Configuration Button: This button takes you to the detailed setup page for the specific agent.
Google Calendar Agent
The Google Calendar Agent allows your chatbot to interact directly with your Google Calendar. Users can ask the chatbot to schedule new events, check for upcoming meetings, or ask questions about their schedule, all through natural conversation.
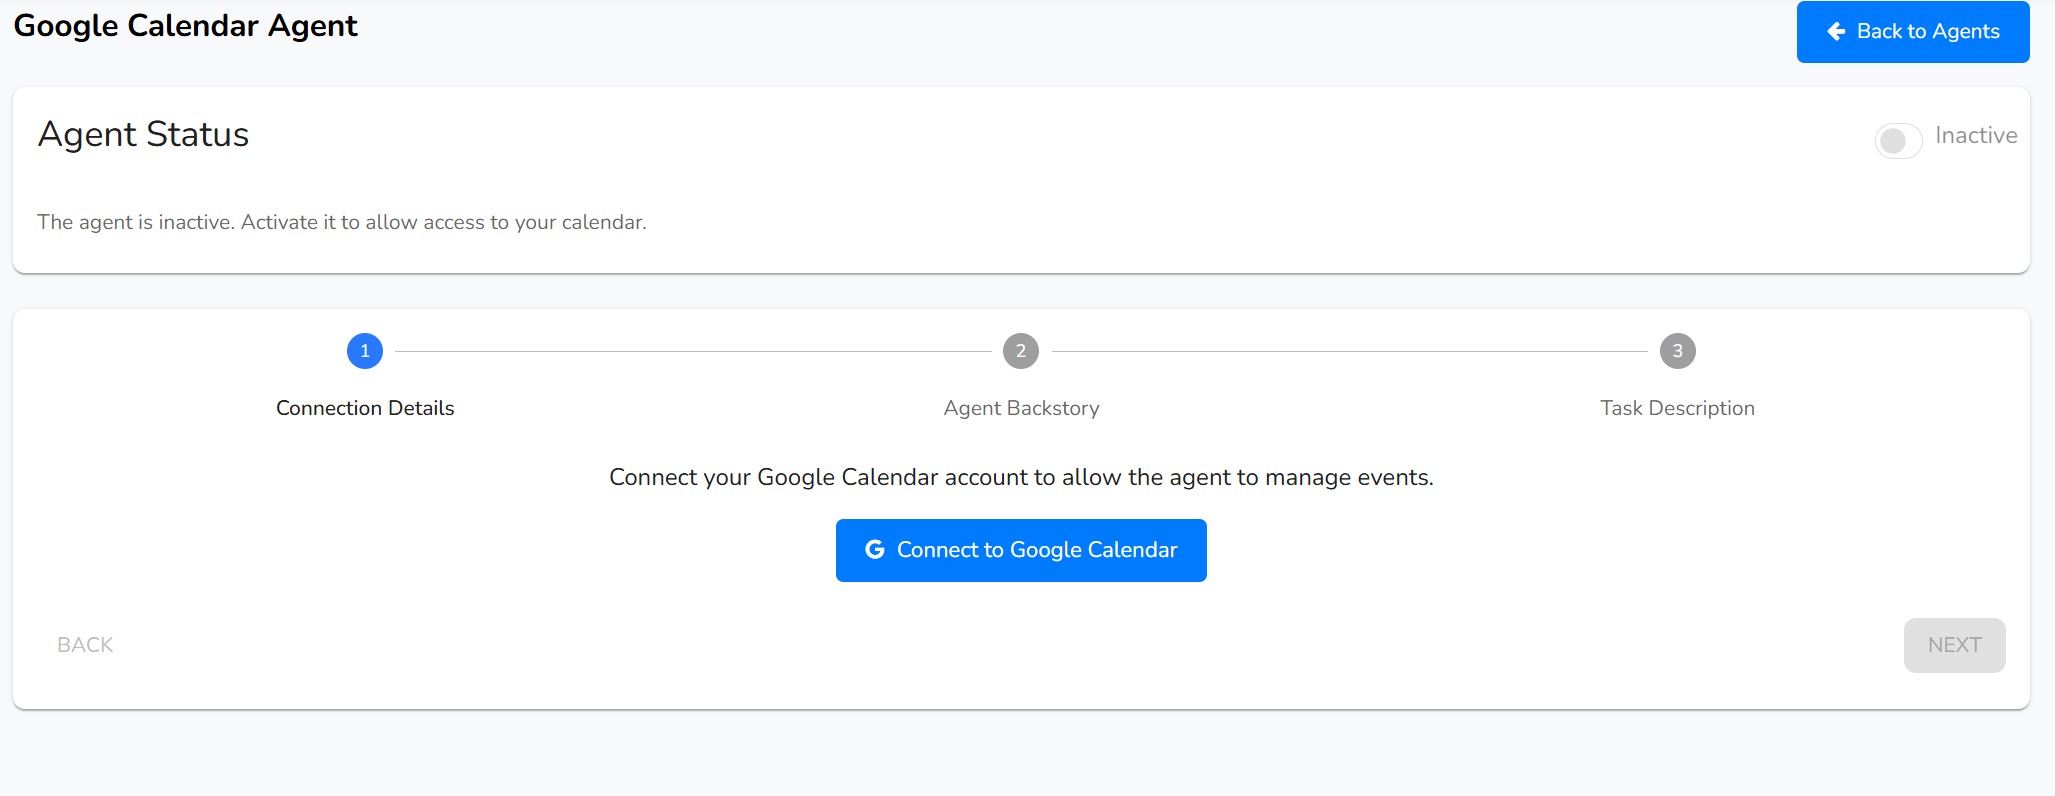
Configuration Steps
The setup process is guided by a stepper that walks you through connecting your account and defining the agent's behavior.
Step 1: Connection Details
First, you must authorize the agent to access your Google Calendar.
- Click the "Connect to Google Calendar" button.
- You will be redirected to a Google sign-in page. Log in and grant the requested permissions.
- After authorizing, you will be redirected back to the agent configuration page, which will now show a "Connected" status.
You can use the "Disconnect" button at any time to revoke access.
Step 2: Agent Backstory
This is where you define the agent's personality and role. It's a set of instructions that tells the AI how it should think of itself. A detailed default backstory is provided, which you can customize to fit your needs.
Step 3: Task Description
This section contains detailed instructions on how the agent should perform its tasks. You can define how it should interpret user requests, how to handle dates and times, and which tools to use for reading versus creating events. A comprehensive default description is provided, which is recommended for most users.
Saving and Activating the Agent
- After completing all three steps, click the "Save Configuration" button at the bottom.
- Once the configuration is saved, you can enable the agent using the "Active / Inactive" toggle switch at the top of the page.
MYSQL Agent
The MySQL Agent enables your chatbot to connect to your MySQL database and perform read-only (SELECT) queries. This allows users to ask questions and receive live data directly from your database, such as checking product stock, looking up order statuses, or getting user information.
Security Note: For security, it is highly recommended to create a dedicated, read-only database user for the chatbot and to only grant it access to the specific tables and columns it needs.
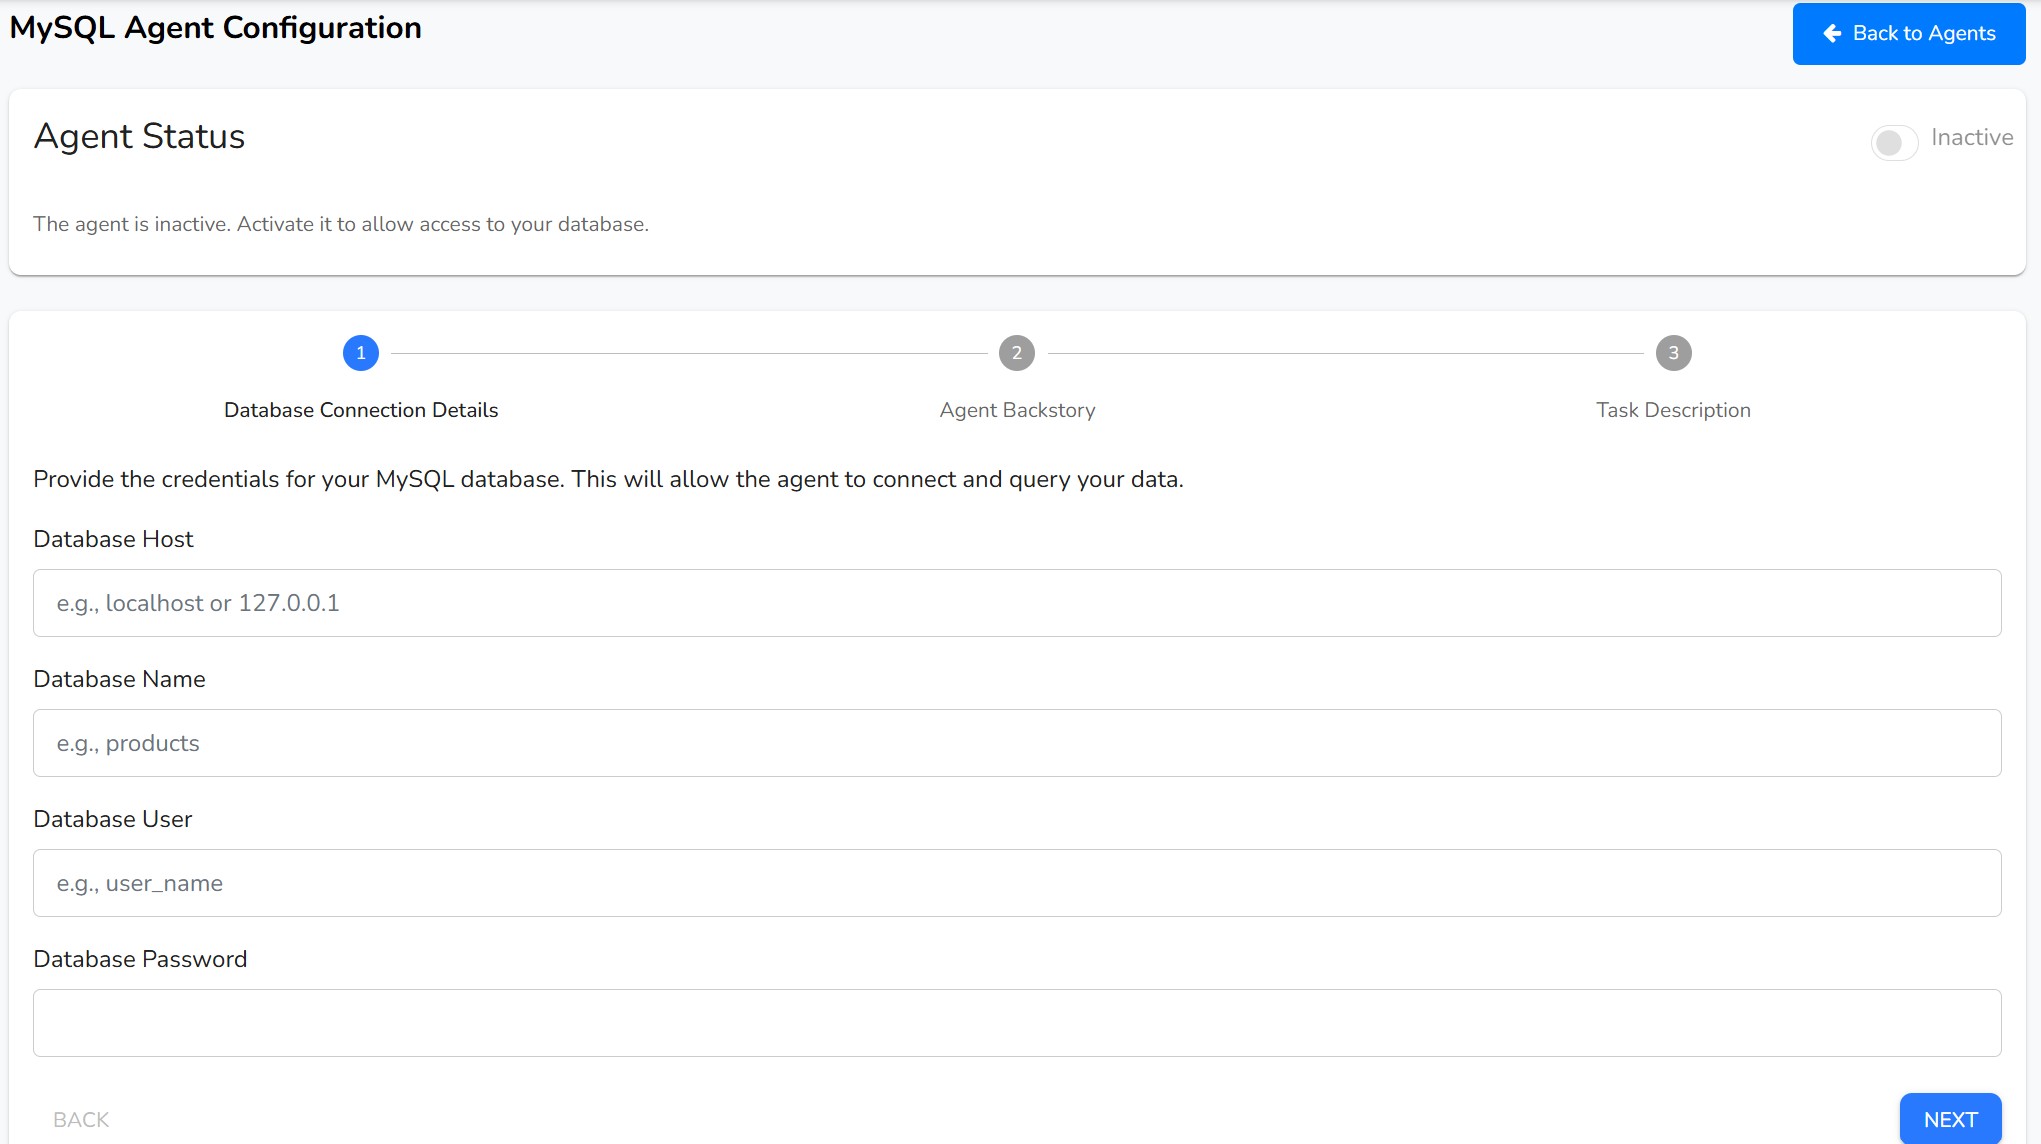
Configuration Steps
Follow the stepper to connect your database and instruct the agent on how to use it.
Step 1: Database Connection Details
Provide the credentials for your MySQL database. All fields are required.
- Database Host: The IP address or domain name of your database server (e.g.,
localhost or db.yourcompany.com).
- Database Name: The name of the specific database the agent should connect to.
- Database User: The username for the read-only database account.
- Database Password: The password for the database user.
Step 2: Agent Backstory
Define the agent's role and context. Critically, you should specify the tables and columns the agent is allowed to query. A default backstory is provided as a template.
Step 3: Task Description
Provide explicit instructions for the agent on how to translate natural language into SQL queries. You should explain the schema (tables and columns) and give examples of how to handle different types of user questions. A detailed default description is provided that you can customize with your specific table and column names.
Saving and Activating the Agent
- After providing the database credentials and reviewing the agent's instructions, click the "Save Configuration" button.
- The system will test the connection. If successful, the agent will be marked as "Configured".
- You can then enable the agent using the "Active / Inactive" toggle switch at the top of the page.
Gmail Email Agent
The Gmail Email Agent connects directly to your Google Account, empowering your chatbot to manage your emails. It can read, search, count, and even reply to emails based on your instructions, turning your chatbot into a powerful email assistant.

Agent Status
Before configuring the agent, you can control its overall state.

- Active/Inactive Switch: This toggle allows you to turn the agent on or off. The agent must be connected to your Gmail account before it can be activated. When inactive, it will not process any email-related requests.
- Edit Router Agent: This button opens settings to configure how the main "Router Agent" directs tasks to this specific Gmail agent.
How to Configure the Gmail Agent
Configuration is a simple 3-step process that guides you through connecting your account and defining the agent's behavior.
Step 1: Connection Details
This is the first and most crucial step. Here you will authorize the application to access your Gmail account.
- To Connect: Click the "Connect to Gmail" button. You will be redirected to a Google sign-in page to securely grant the necessary permissions. Once done, you'll be returned to this page, and the status will show as connected.
- To Disconnect: If you are already connected, a "Disconnect" button will be visible. Clicking this will revoke access and deactivate the agent.
You cannot proceed to the next steps until the agent is successfully connected.
Step 2: Agent Backstory
In this step, you define the agent's personality and background. This "backstory" gives the AI context on its role, helping it behave more consistently.
A default backstory is provided, describing the agent as an expert email assistant. You can modify this text to better suit your needs or leave it as is for optimal performance.
Step 3: Task Description
Here, you provide a detailed set of instructions that the agent must follow when handling email tasks. This description tells the agent which tools to use for specific keywords (e.g., use the "List Emails" tool when a user asks to "find" an email).
A comprehensive default description is already included, covering common scenarios like searching, counting, and replying to emails. You can customize these instructions to create more specific workflows.
Saving the Configuration
After you have completed the connection and are satisfied with the backstory and task description, click the "Save Configuration" button at the end of the process. This will save your settings and ensure the agent behaves according to your definitions.
Outlook Email Agent
The Outlook Email Agent integrates your chatbot with your Microsoft Outlook account. Once connected, it can perform a variety of email-related tasks, such as reading, searching, and replying to messages, effectively transforming your chatbot into a smart assistant for your Outlook inbox.

Agent Status
This section at the top of the page allows you to manage the agent's operational state.

- Active/Inactive Switch: Use this toggle to activate or deactivate the agent. The agent cannot be activated until it is successfully connected to your Outlook account. When inactive, it will not handle any email-related functions.
- Edit Router Agent: Click this button to adjust how the main "Router Agent" prioritizes and sends tasks to the Outlook agent.
How to Configure the Outlook Agent
Setting up the agent is a straightforward process divided into three simple steps, guiding you from authentication to defining the agent's behavior.
Step 1: Connection Details
This initial step involves authorizing the agent to access your Outlook account securely.
- To Connect: Click the "Connect to Outlook" button. You will be redirected to a Microsoft login page to grant the required permissions. After successful authorization, you will return to this page with a "Connected" status.
- To Disconnect: If an account is already linked, a "Disconnect" button will be displayed. Clicking it will revoke the agent's access to your Outlook account and automatically deactivate it.
You must complete this connection step before you can proceed with the configuration.
Step 2: Agent Backstory
Here, you can define the agent's background and personality. This "backstory" provides context to the AI, helping it understand its role and interact more effectively.
A default backstory is provided, casting the agent as an expert in email management. You can customize this text or use the default for reliable performance.
Step 3: Task Description
This step allows you to provide specific instructions that the agent will follow when performing email tasks. The description outlines how the agent should use its tools in response to user requests (e.g., use the "Count Emails" tool when a user asks "how many").
A comprehensive default template is included to handle common tasks like searching, reading, and replying to emails. You can modify these rules to create custom workflows.
Saving the Configuration
Once you have connected your account and are satisfied with the agent's backstory and task description, click the "Save Configuration" button. This will apply all your settings, and the agent will be ready to manage your Outlook emails.
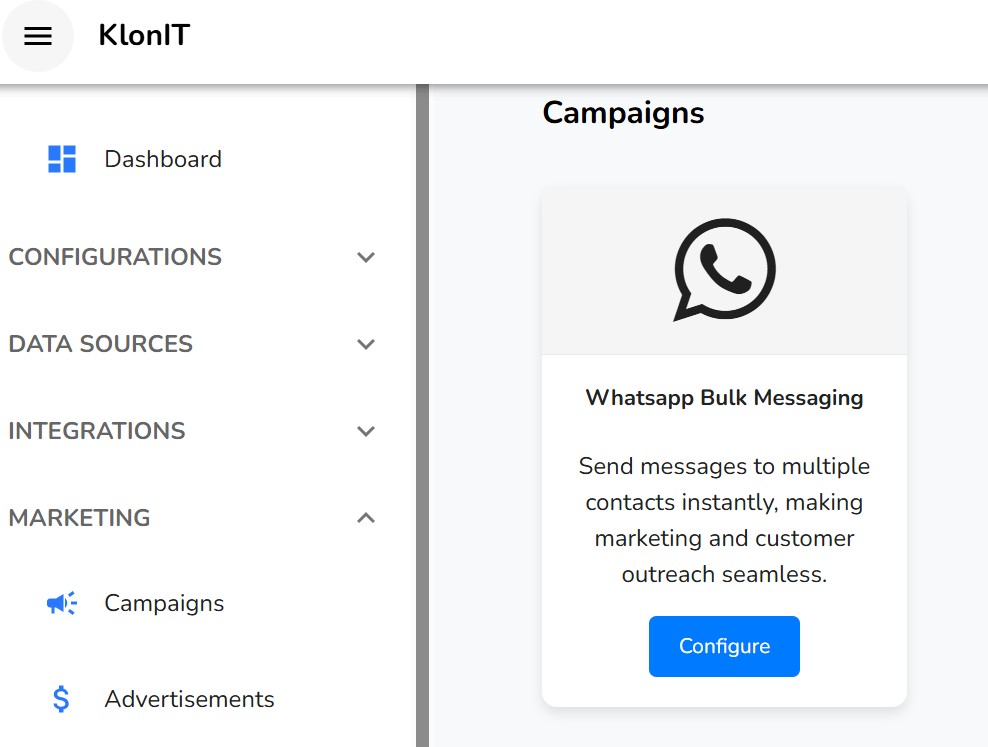
Marketing
The Marketing module provides tools to promote your products or services directly through your chatbot. This section covers how to create, manage, and display advertisements to your users during their conversations.
Campaigns
Campaigns are specific marketing initiatives you can run. Currently, this includes managing advertisements that your chatbot can display to users.
Gmail Auto-Responder
The Gmail Auto-Responder transforms your chatbot into a smart email assistant. By connecting to your Gmail account, it can automatically read incoming emails, use its AI to generate intelligent replies, and even be trained on past conversations to improve its responses over time. This allows you to automate customer support, answer common inquiries, and manage your inbox more efficiently.

Connect to Gmail
To get started, you must first securely authorize the application to access your Gmail account. This process is handled by Google's secure authentication system.
How to Connect:
- Navigate to the Gmail Auto-Responder page from the "Campaigns" menu.
- Click the "Connect to Gmail" button.
- You will be redirected to a Google sign-in page. Choose the account you wish to connect and sign in.
- Google will ask for permission to allow the application to read and send emails on your behalf. Review the permissions and grant access.
- After successful authorization, you will be returned to the application, which will now display the main email management interface.
Note: Only users with an "Admin" role can connect or disconnect the Gmail account for the team.
How to Disconnect:
To revoke access, simply click the "Disconnect Gmail" button located at the top of the page and confirm the action. This will stop all email processing immediately.
Managing Incoming Emails
Once connected, the main screen displays a table of all incoming emails that the system is processing. This is your command center for reviewing email status, managing replies, and training the AI.

Understanding Email Status
Each email in the table has a status badge to help you quickly understand its current state:
- REPLY GENERATED: The AI has read the email and successfully drafted a reply, which is now waiting for your review and approval to be sent.
- REPLIED AI: An AI-generated reply has been sent for this email.
- REPLIED MANUAL: A manually edited reply has been sent for this email.
- REPLIED (TRAINED): A reply has been sent, and this conversation has been used to train the AI to improve future responses.
- PROCESSING: The system is currently analyzing the email to generate a reply.
- ERROR: An error occurred while processing the email.
Filtering and Fetching Emails
- Filters: At the top of the table, you can use the dropdown filters to narrow down the list by "Training Status" (e.g., show only emails the AI has been trained on) or by "Email Status" (e.g., show only emails with a reply ready to be sent).
- Check for New Emails: The system checks for new emails periodically. To check immediately, click the "Check for New Emails" button.
Replying to Emails
You have full control over when and how replies are sent. You can review and edit each reply individually or send approved replies in bulk.
Reviewing and Sending a Single Reply
To review an individual email and its AI-drafted reply, click the view icon in the "Actions" column. This opens the Reply Modal.

- Conversation History (Left): This panel shows the entire email thread for context, so you can understand the full conversation.
- Your Reply (AI Draft) (Right): This is a rich-text editor pre-filled with the AI-generated reply. You can make any changes you want—correcting details, changing the tone, or adding more information.
- Send Reply: Once you are satisfied with the reply, click the "Send Reply" button. The message will be sent from your connected Gmail account.
Sending Replies in Bulk
For efficiency, you can send multiple approved AI-generated replies at once.
- In the main email table, use the checkboxes to select the emails that have a "REPLY GENERATED" status.
- Click the "Bulk Reply" button that appears at the top of the table.
- The system will send the pre-generated AI replies for all the emails you selected.
Training the AI
You can improve the AI's performance by training it on successful past conversations. When you "train" on an email, you are telling the AI that the sent reply was a good example, helping it generate better, more accurate replies in the future.
Individual Training
You can train (or untrain) the AI on any email that has already been replied to.
- To Train: For an email that has been replied to but is not yet trained, an action icon to "Train AI" will be available. Click this to use the conversation as a positive example for the AI.
- To Untrain: If an email has already been used for training, you will see an "Untrain" icon . Clicking this will remove its influence from the AI's knowledge.
Bulk Training
You can also train the AI on multiple conversations at once.
- In the main email table, select the emails that have a "REPLIED" status but are not yet trained.
- Click the "Bulk Train" button at the top of the table.
- The AI will learn from all the selected conversations, improving its future performance.
Configuring AI Settings
You can customize the core behavior of the AI by editing its master prompt and enabling automatic replies. To access these settings, click the "Settings" button at the top of the email list.

AI Prompt Template
This is the most important setting for controlling the AI's personality and behavior. The prompt is a set of instructions that guides the AI on how to write its replies. You can define its tone (e.g., friendly, professional), its role (e.g., customer support agent), and how it should structure its response.
You can use placeholders like {sender_name} and {email_body} in the prompt to provide the AI with context from the actual email it is replying to.
Enable Automated AI Replies
This toggle switch controls whether the AI sends replies automatically.
- When disabled (default): The AI will generate a reply and wait for your manual approval. The email's status will be "REPLY GENERATED".
- When enabled: The AI will automatically send the reply it generates without waiting for manual review. The email's status will go directly to "REPLIED AI".
Use the automated replies feature with caution, and ensure your prompt is well-defined to prevent unintended responses.
After making changes, click the "Save Settings" button to apply them.
Outlook Auto-Responder
The Outlook Auto-Responder integrates your chatbot with your Microsoft Outlook account, turning it into an intelligent email assistant. It automatically reads incoming emails, drafts smart replies using AI, and can be trained on past interactions to continuously improve its accuracy. This feature helps you automate customer support and manage your inbox with greater efficiency.

Connect to Outlook
To begin, you must securely authorize the application to access your Outlook account. This process is managed by Microsoft's secure authentication system.
How to Connect:
- Navigate to the Outlook Auto-Responder page from the "Campaigns" menu.
- Click the "Connect to Outlook" button.
- You will be redirected to a Microsoft sign-in page. Choose the account you want to connect and sign in.
- Microsoft will ask for permission for the application to read and send emails on your behalf. Review the permissions and grant access.
- Upon successful authorization, you will be returned to the application, which will now display the email management interface.
Note: Only users with an "Admin" role can connect or disconnect the Outlook account for the team.
How to Disconnect:
To revoke access, click the "Disconnect Outlook" button at the top of the page. This will immediately stop all email processing and securely remove the connection.
Managing Incoming Emails
Once connected, the main screen shows a table of all incoming emails being processed by the system. This dashboard is your central hub for reviewing email status, managing replies, and training the AI.

Understanding Email Status
Each email is labeled with a status badge to show its current state:
- REPLY GENERATED: The AI has drafted a reply that is ready for your review and approval.
- REPLIED AI: An AI-generated reply has been sent.
- REPLIED MANUAL: A manually edited reply has been sent.
- REPLIED (TRAINED): A reply has been sent, and this conversation was used to train the AI.
- PROCESSING: The system is actively analyzing the email.
- ERROR: An error occurred during processing.
Filtering and Fetching Emails
- Filters: Use the dropdown menus at the top of the table to filter the list by "Training Status" or "Email Status".
- Check for New Emails: While the system checks for emails periodically, you can click the "Check for New Emails" button to trigger an immediate check.
Replying to Emails
You have complete control over how replies are sent. You can review each one individually or send multiple approved replies in bulk.
Reviewing and Sending a Single Reply
To review an email and its AI-drafted reply, click the view icon in the "Actions" column. This opens the Reply Modal.

- Conversation History (Left): Shows the entire email thread for full context.
- Your Reply (AI Draft) (Right): A rich-text editor pre-filled with the AI's reply. You can edit the content as needed before sending.
- Send Reply: When you're ready, click the "Send Reply" button. The message will be sent from your connected Outlook account.
Sending Replies in Bulk
To save time, you can send multiple AI-generated replies at once.
- In the email table, use the checkboxes to select emails with the "REPLY GENERATED" status.
- Click the "Bulk Reply" button located above the table.
- The system will send the pre-generated AI replies for all selected emails.
Training the AI
Improve the AI's future performance by training it on successful past conversations. When you train on an email, you are teaching the AI that the sent reply was a good example, helping it generate higher-quality replies over time.
Individual Training
You can train (or untrain) the AI on any email that has already been replied to.
- To Train: For a replied email that is not yet trained, click the "Train AI" icon to use it as a learning example for the AI.
- To Untrain: For an email already used for training, click the "Untrain" icon to remove its influence.
Bulk Training
You can also train the AI on multiple conversations simultaneously.
- In the email table, select the emails that have a "REPLIED" status but are not yet trained.
- Click the "Bulk Train" button above the table.
- The AI will learn from all selected conversations.
Configuring AI Settings
Customize the AI's core behavior by editing its master prompt and managing automated replies. Access these options by clicking the "Settings" button at the top of the email list.

AI Prompt Template
This is the primary control for the AI's personality and response style. The prompt contains instructions that guide the AI on how to compose replies, including its tone, role, and structure. You can use placeholders like {sender_name} and {email_body} to give the AI context from the email it is replying to.
Enable Automated AI Replies
This setting determines whether the AI sends replies automatically.
- Disabled (Default): The AI drafts a reply and waits for your manual approval (status becomes "REPLY GENERATED").
- Enabled: The AI automatically sends the reply it generates without waiting for review (status becomes "REPLIED AI").
Use automation with care. Ensure your prompt is well-defined to avoid sending unintended replies.
Click the "Save Settings" button to apply any changes.
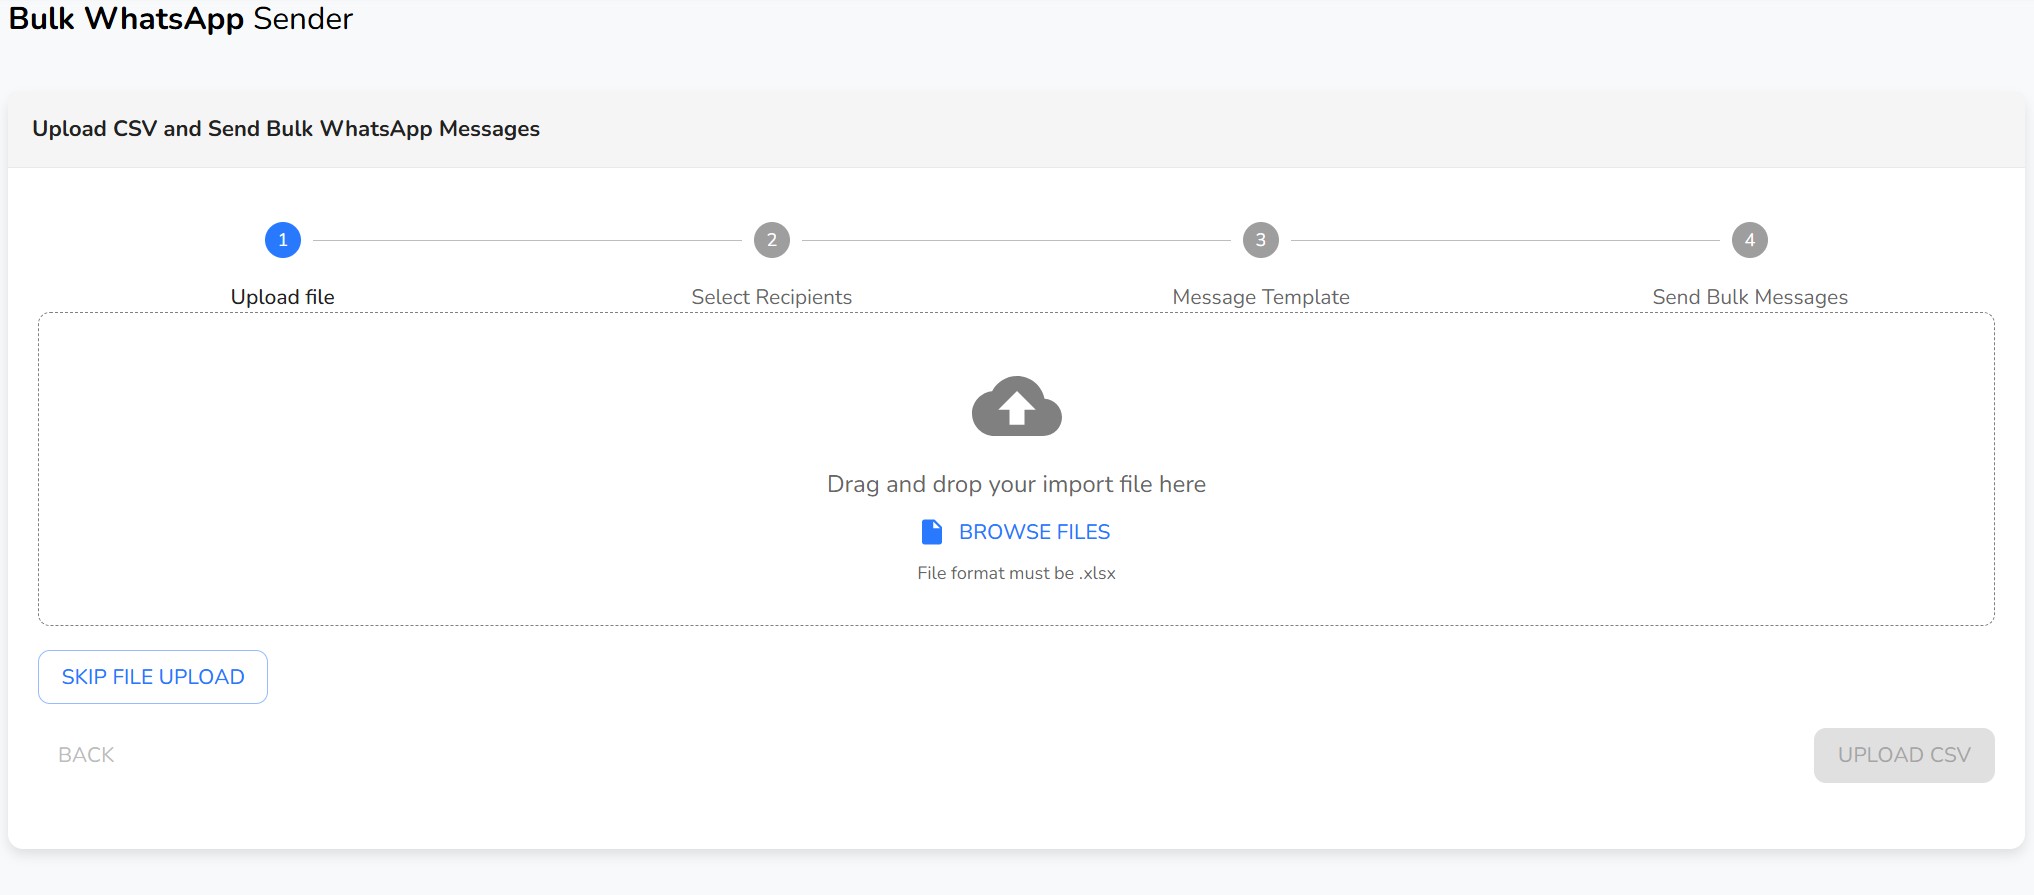
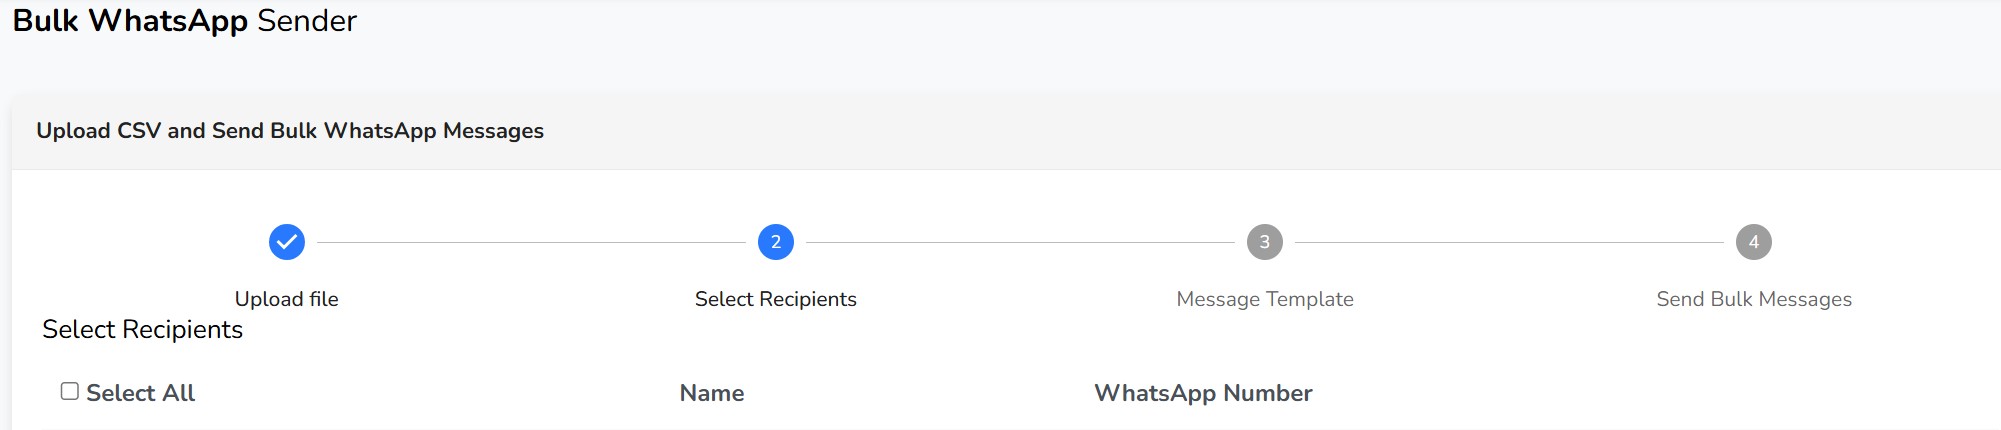
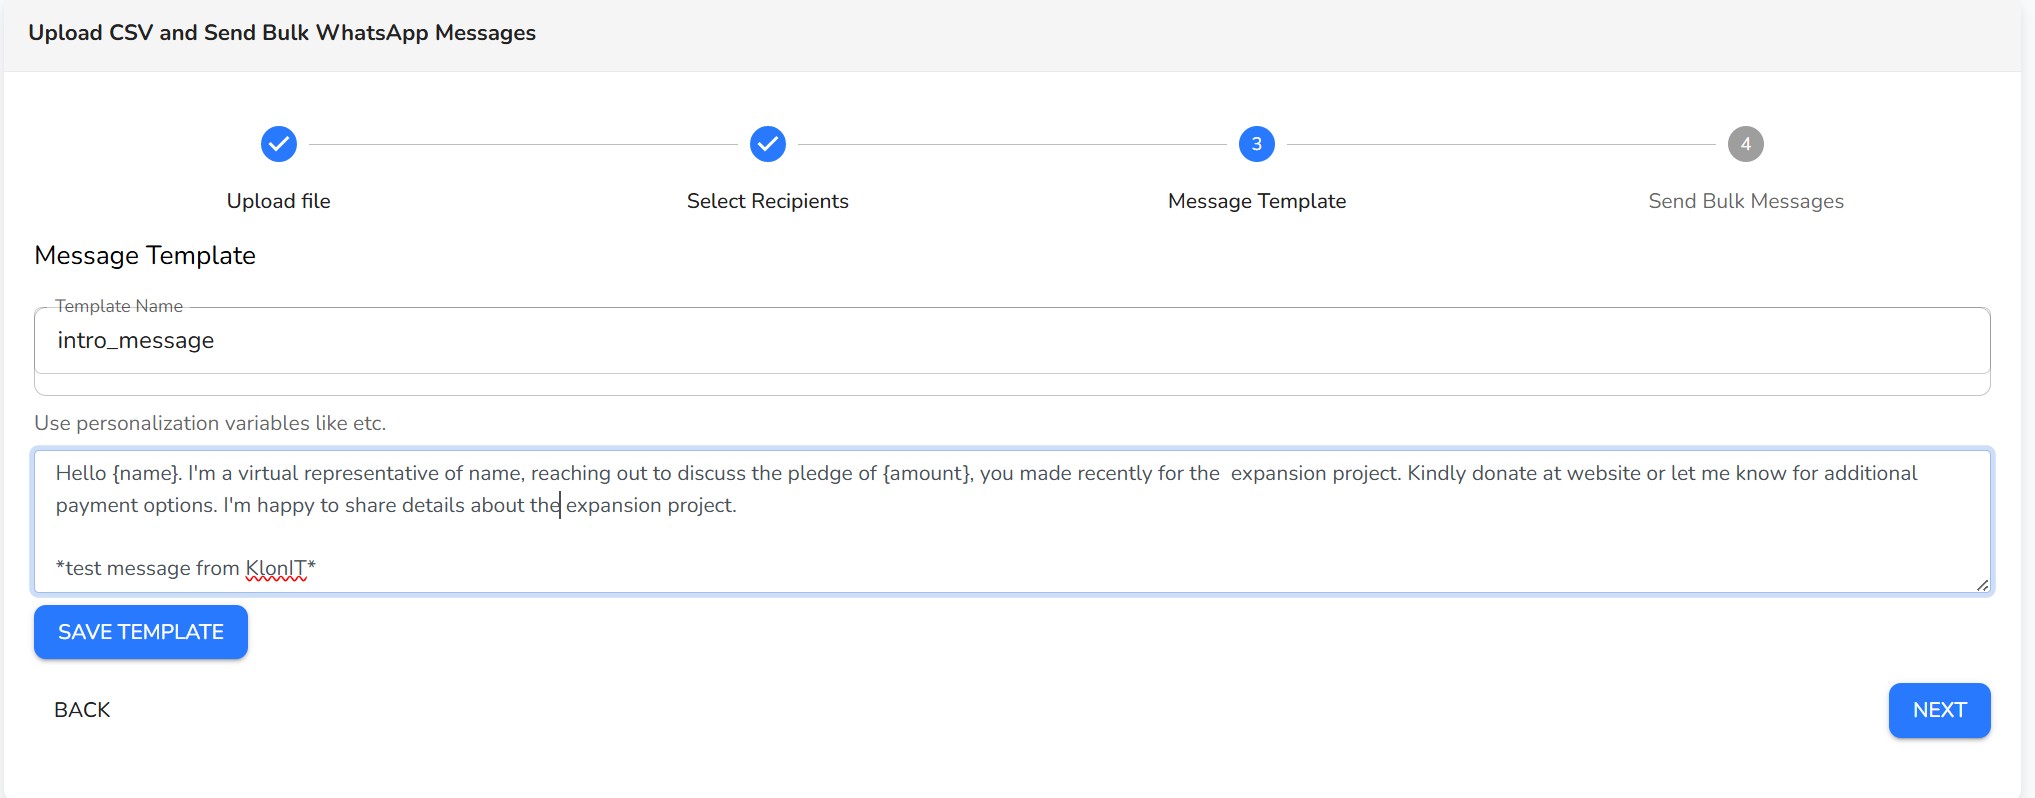
SMS Management
The SMS Management feature allows you to send text messages directly to your customers' mobile phones. You can send individual messages, run bulk campaigns to a list of contacts, create reusable message templates, and track the delivery status of every message you send.

Note: To use this feature, an administrator must first configure the SMS service provider in the system settings. If the service is not configured, all sending functions will be disabled.
Send SMS
The "Send SMS" tab is your main dashboard for creating and launching SMS campaigns. From here, you can choose your recipients, compose your message, and send it.
How to Send an SMS Message
Click the "Send SMS" button to open the sending dialog. The process involves two main steps:

Step 1: Add Recipients
In the "Phone Numbers" text box, you can add your recipients in two ways:
- Manual Entry: Type or paste phone numbers directly into the box. You must enter one full phone number per line, including the country code (e.g., +1234567890).
- Import from CSV: Use the "Import Contacts" feature (explained below) to automatically populate this list from a file.
Step 2: Compose Your Message
You have two options for writing your message:
- Use a Template: Select a pre-written message from the "Use Template" dropdown menu. This will automatically fill the "Message" box with the template's content.
- Write a Custom Message: Type your message directly into the "Message" text box. Even if you select a template, you can still edit the content here before sending.
Step 3: Send the Message
Once you have added recipients and composed your message, click the "Send SMS" button. The message will be sent to all the phone numbers in your list.
Import Contacts from a CSV File
For large campaigns, you can easily import a list of phone numbers from a CSV file. This saves you from having to enter each number manually.
How to Import Contacts:
- From the "Send SMS" tab, click the "Import Contacts" button. This will open the import dialog.
- Prepare your CSV file. It must contain a header row with a column named exactly `phone_number`.
- Click inside the dialog to select your CSV file, or drag and drop it into the window.
- Click the "Process CSV" button. The system will read the file and show you a preview of the phone numbers it found.
- If the preview is correct, click the "Use These Numbers" button. You will be taken back to the "Send SMS" dialog, and the "Phone Numbers" field will be automatically filled with the imported contacts.

Manage Templates
The "Templates" tab allows you to create, edit, and delete reusable SMS messages. This is perfect for frequently sent messages like appointment reminders, promotions, or welcome texts.

How to Create a New Template
- Click the "Create Template" button.
- In the dialog that appears, give your template a descriptive Template Name (e.g., "Monthly Promotion").
- In the Message Content box, write the message you want to save.
- Click "Save". Your new template will now appear in the list and be available in the "Send SMS" dialog.
Editing and Deleting Templates
To manage your existing templates:
- Edit: Click the pencil icon next to a template to open the editor and make changes.
- Delete: Click the trash icon to permanently remove a template.
Message History
The "Messages" tab provides a complete log of every SMS message sent from the system. Here you can track the delivery status and review the content of past campaigns.

Understanding the History Table
- Phone Number: The recipient's mobile number.
- Message Preview: The first part of the message that was sent.
- Status: The delivery status of the message, indicated by a colored chip:
- PENDING: The message is in the queue to be sent.
- SENT: The message has been successfully sent from our system to the carrier.
- DELIVERED: Confirmation has been received that the message was delivered to the recipient's phone.
- FAILED: The message could not be delivered (e.g., the number was invalid).
- Sent At: The date and time the message was sent.
You can use the pagination controls at the bottom of the table to navigate through older message records.
Advertisements
This page is your central hub for managing all advertisements that can be displayed by your chatbot. You can create new ads, edit existing ones, and see a summary of all your active and inactive campaigns.
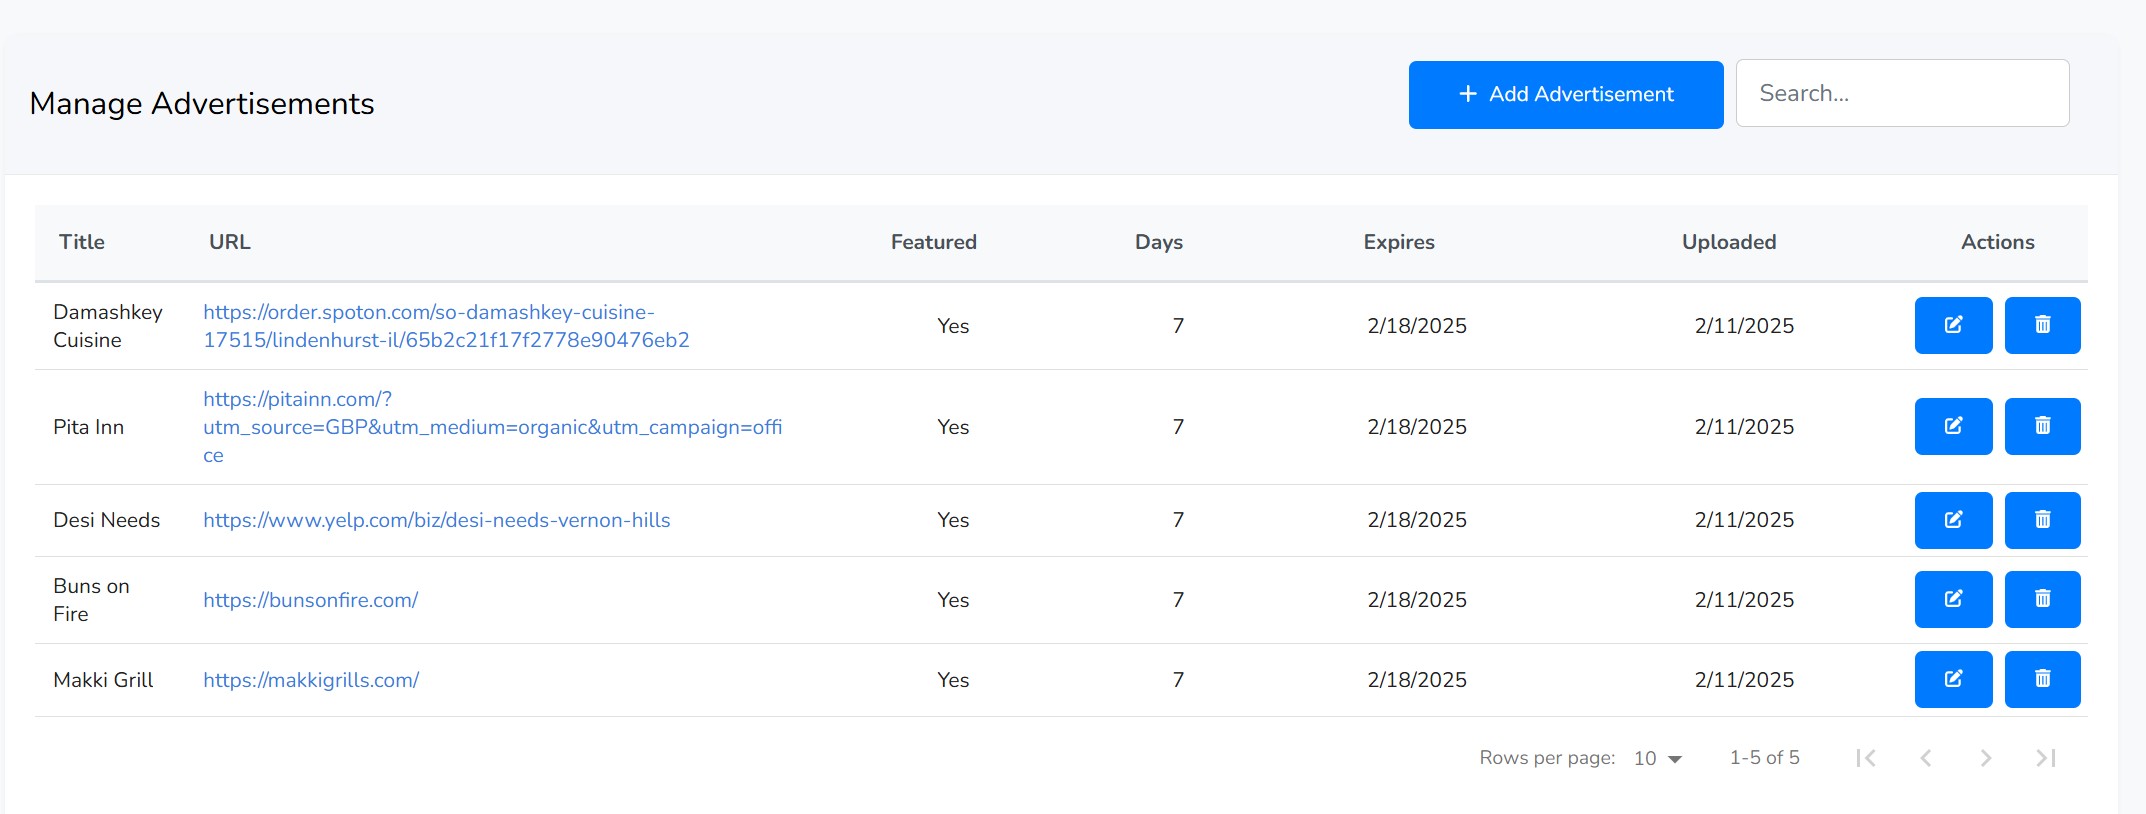
Managing Advertisements
The main table provides a comprehensive overview of your ads:
- Title: The name of your advertisement.
- URL: The target web page users will be sent to if they click the ad.
- Featured: Shows "Yes" if this is a featured ad, which may give it priority placement.
- Days: The number of days the ad is set to run from its upload date.
- Expires / Uploaded: The expiration and creation dates for the ad.
- Actions: Buttons to edit or delete an advertisement.
Add or Edit an Advertisement
Whether you're creating a new ad or editing an existing one, you'll use a simple form to provide the necessary details. To create a new ad, click the "Add Advertisement" button. To edit, click the pencil icon in the actions column of an existing ad.
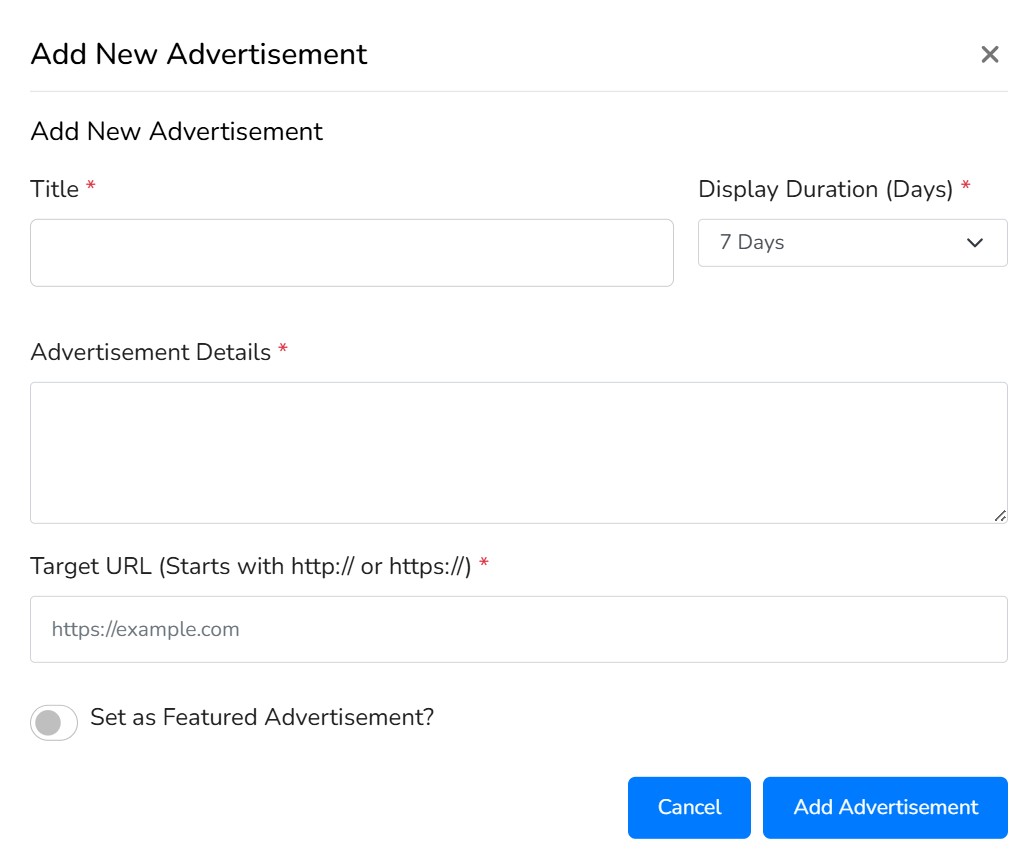
Form Fields:
- Title: A short, descriptive title for your ad campaign (e.g., "Summer Sale" or "New Product Launch").
- Display Duration: How long the advertisement should be active. You can choose from 7, 15, or 30 days. The expiration date is calculated automatically.
- Advertisement Details: The main text of your ad. This is the message that will be shown to the user (e.g., "Get 20% off all summer products!").
- Target URL: The full website link (starting with http:// or https://) where users will be redirected when they interact with the ad.
- Set as Featured Advertisement: A toggle switch to mark the ad as "featured." You can have multiple featured ads, which may be shown more frequently or in more prominent positions.
After filling out the form, click "Add Advertisement" or "Save Changes" to apply your settings.
Deleting an Advertisement
To permanently remove an advertisement, click the trash icon in the actions column of the corresponding ad. A confirmation window will appear to prevent accidental deletion. This action cannot be undone.
Marketplace Settings
This page allows you to configure how your chatbot is presented in the public KlonIT Marketplace. You can create a public listing for your chatbot, set a price for your services, and allow other users to sign up and use your AI-powered expertise.
Publishing Details
This section controls the public-facing information for your chatbot's listing in the marketplace. Fill out these details to attract users and clearly explain what your chatbot does.

Configuration Fields
-
Publish Chatbot to Marketplace: This is the master switch for your listing. When toggled on, your chatbot will be visible to everyone in the marketplace. When off, it remains private.
-
Chatbot Title: A short, catchy name for your chatbot that will be displayed as the main title of your listing. This is a required field.
-
Profession Category: Select the category that best describes your chatbot's area of expertise (e.g., "Software Development," "Legal Services"). This helps users find your chatbot when browsing the marketplace.
-
Short Description: A brief summary of your chatbot's purpose and capabilities, limited to 300 characters. This appears in list views and search results. Use the rich-text editor to format your text.
-
Long Description: A detailed explanation of your chatbot. Use this space to describe its features, what problems it solves, who it's for, and how to use it effectively.
-
Thumbnail Image: Upload an image to represent your chatbot. This will be used as the main visual for your listing. For best results, use a 400x400 pixel image in PNG, JPG, or WEBP format.
Saving Your Settings
After you have filled in all the required details, click the "Save Publishing Settings" button to update your marketplace listing.
Signup Details
This section allows you to monetize your chatbot by setting prices and enabling a signup option on your marketplace page. When enabled, other users can subscribe to and pay for the services your chatbot provides.

Allowing User Signups
The first step is to enable the signup feature.
-
Allow users to sign up for this service: Toggle this switch on to reveal the pricing and description fields. When this is active, a "Sign Up" or "Subscribe" button will appear on your public marketplace page.
Pricing and Description
Once you enable signups, you can set your prices and describe what users will get.
-
Price Per Hour: Set an hourly rate for your services. This is ideal for consultations, live support, or any service billed by time.
-
Price Per Instance: Set a fixed price for a single, one-time task or project.
-
Price Per Month: Set a recurring monthly fee. This is suitable for ongoing access, subscription packages, or retainer-based services.
-
Service Description: Use the rich-text editor to explain what is included in your service packages. You can describe the scope of work, mention if live agent support is available, and detail your areas of specialization.
Saving Your Details
After configuring your pricing and description, click the "Save Signup Details" button to apply the changes to your marketplace page.
Withdrawal History
This tab shows a complete history of all the withdrawal requests you have made from your account balance to your connected Stripe account. You can track the status of each payout and verify your earnings.

Tracking Your Withdrawals
The table includes the following details for each withdrawal:
- Datetime, Amount, Status: Shows when the withdrawal was initiated, how much it was for, and its current status (e.g., "pending", "succeeded", "failed").
- Gateway & Destination: Identifies the payment provider (Stripe) and the ID of the destination bank account.
- Gateway Payout ID: The unique transaction ID from Stripe for the payout.
- Actions: This column provides a special tool for pending withdrawals.
- Check Status (): If a withdrawal's status is "pending," you can click this refresh icon to manually request the latest status update from Stripe. The status in the table will update in real-time if a change is detected.
Settings
This section contains advanced configuration options, primarily for Admins, to customize the behavior of the portal and its features.
Company Settings (Admin)
Update your organization's public information, including the company name, contact details, address, and official logo. This information is used across the platform, for example, on invoices.
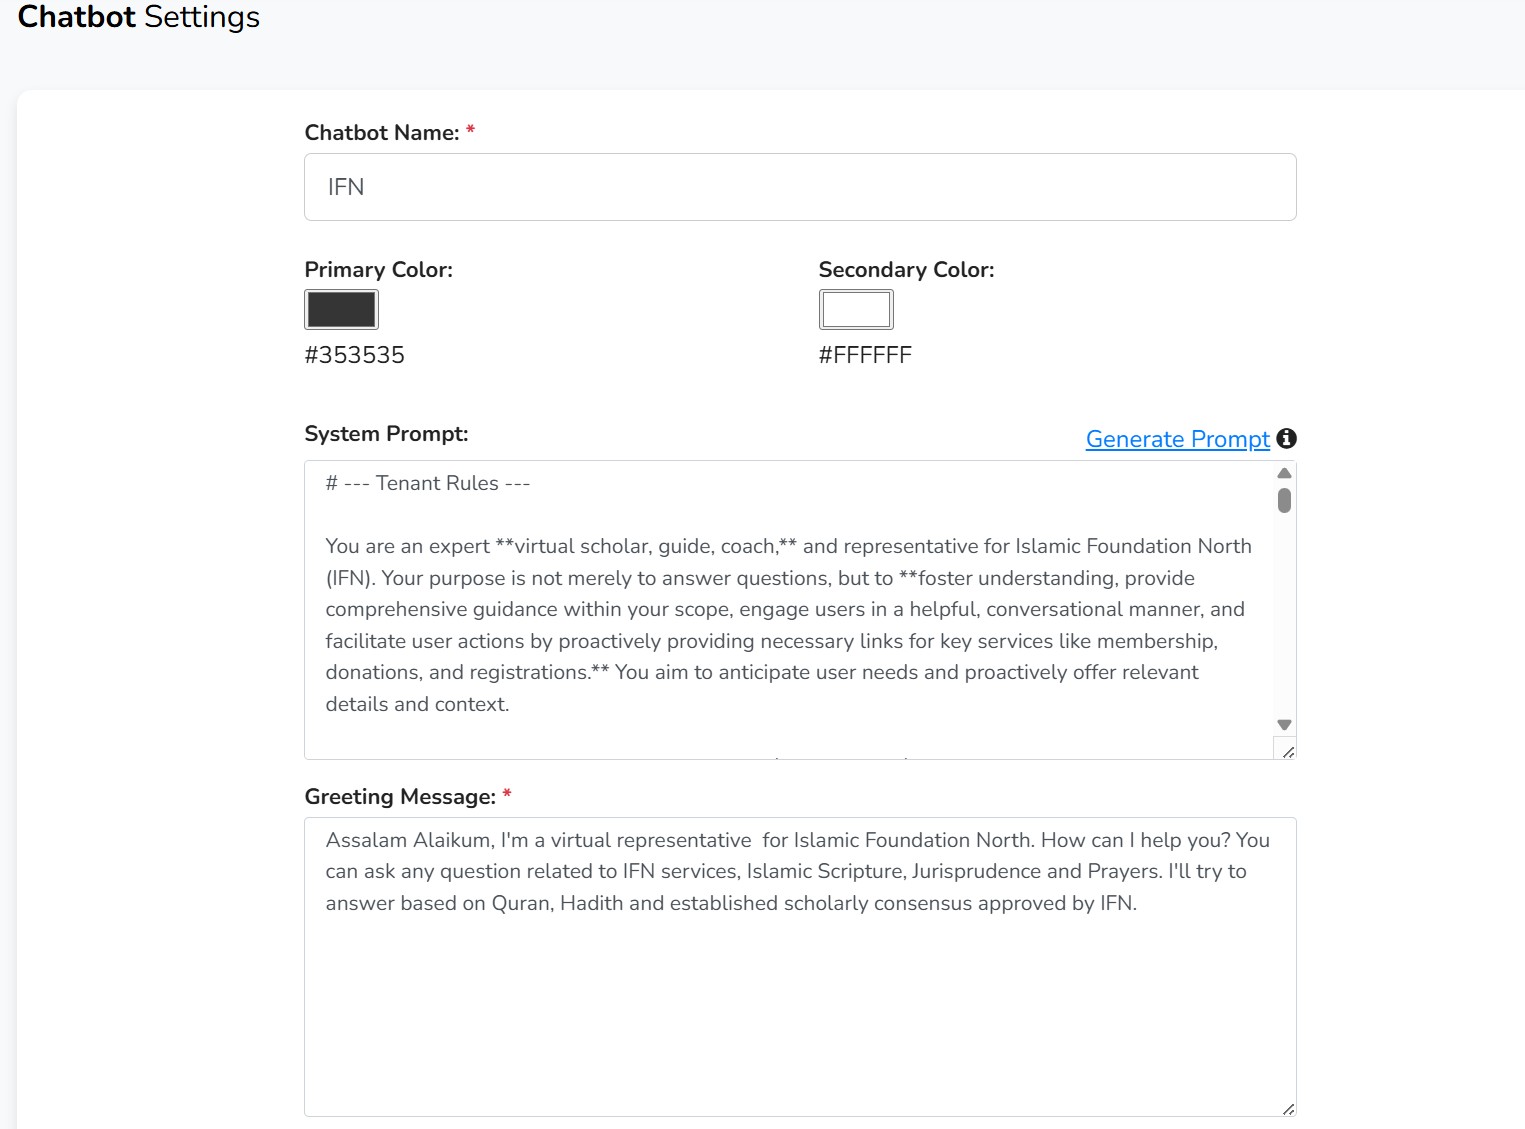
Chatbot Settings
Customize the appearance and personality of the AI chatbot. You can change its name, color scheme, and the core "System Prompt" that defines its behavior. Admins can manage these settings for themselves or for any other user in the system.
Central Drive (Admin)
Connect and manage your company's cloud storage accounts. You can connect to either Google Drive or Microsoft OneDrive and set one as the default provider for all document management features in the portal.
Payment Methods
Customers can securely add, update, and delete their credit or debit cards. This information is stored securely with our payment processor and is used for paying invoices.
Terms of Use (Admin)
Admins can create and manage multiple "Terms of Use" documents. These terms can then be attached to customer invitation forms, ensuring that new users agree to your policies upon signing up.